
Ecash design best practices
Common ecash design guidelines
When designing bitcoin-backed ecash applications, it’s important to prioritize clear and intuitive interfaces that allow users to easily manage their tokens, whether minting, sending, or redeeming them. Many of the same design principles for sending and requesting from the lightning wallet reference design apply here as well.
Since ecash is still a relatively new technology this guide focuses on best practices for managing tokens and communicating mint and federation details. As the ecash ecosystem develops we encourage designers and developers to contribute their insights and help improve this guide.
User onboarding
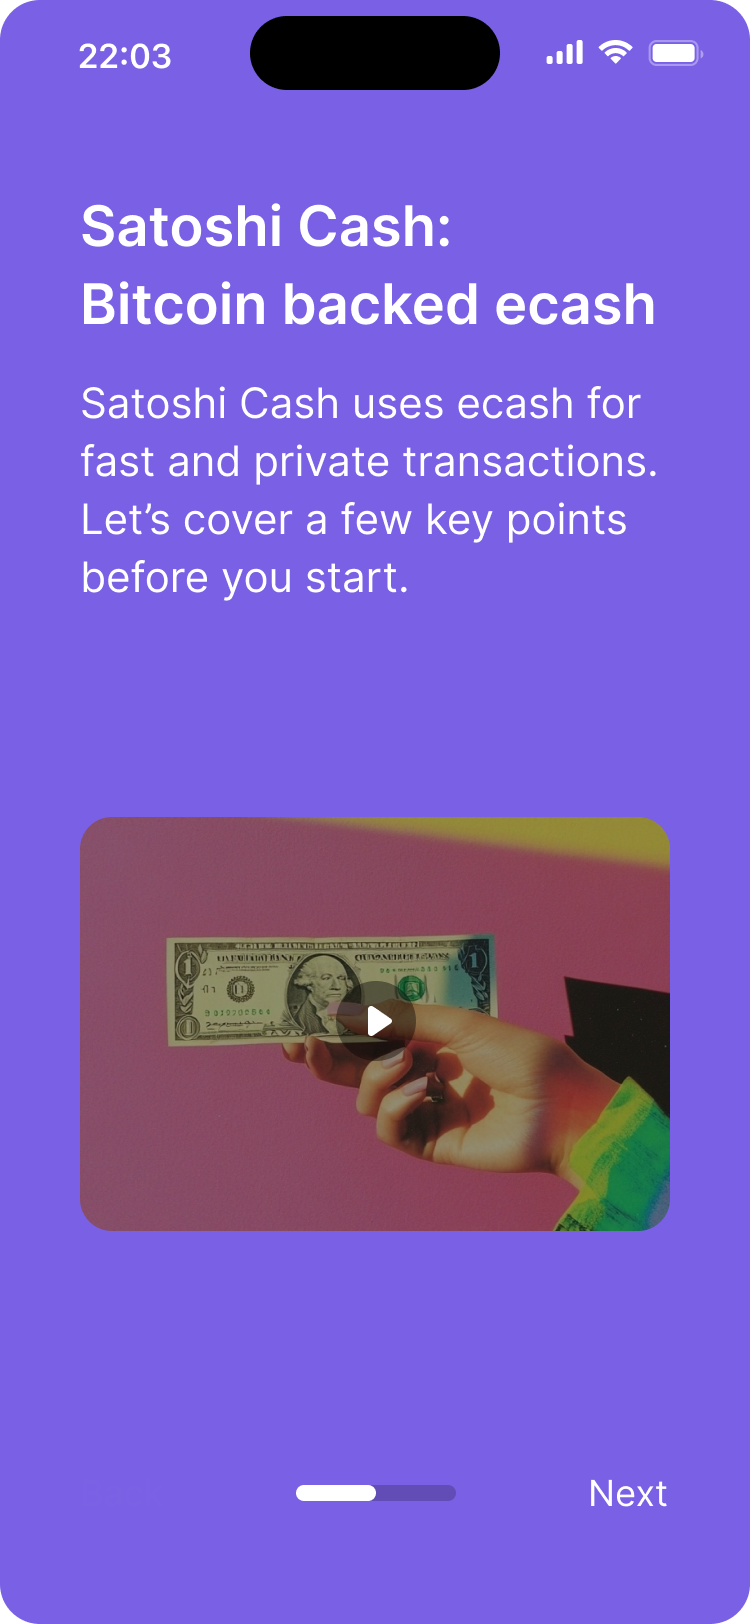
Landing screen for Satoshi Cash, a bitcoin-backed ecash wallet.
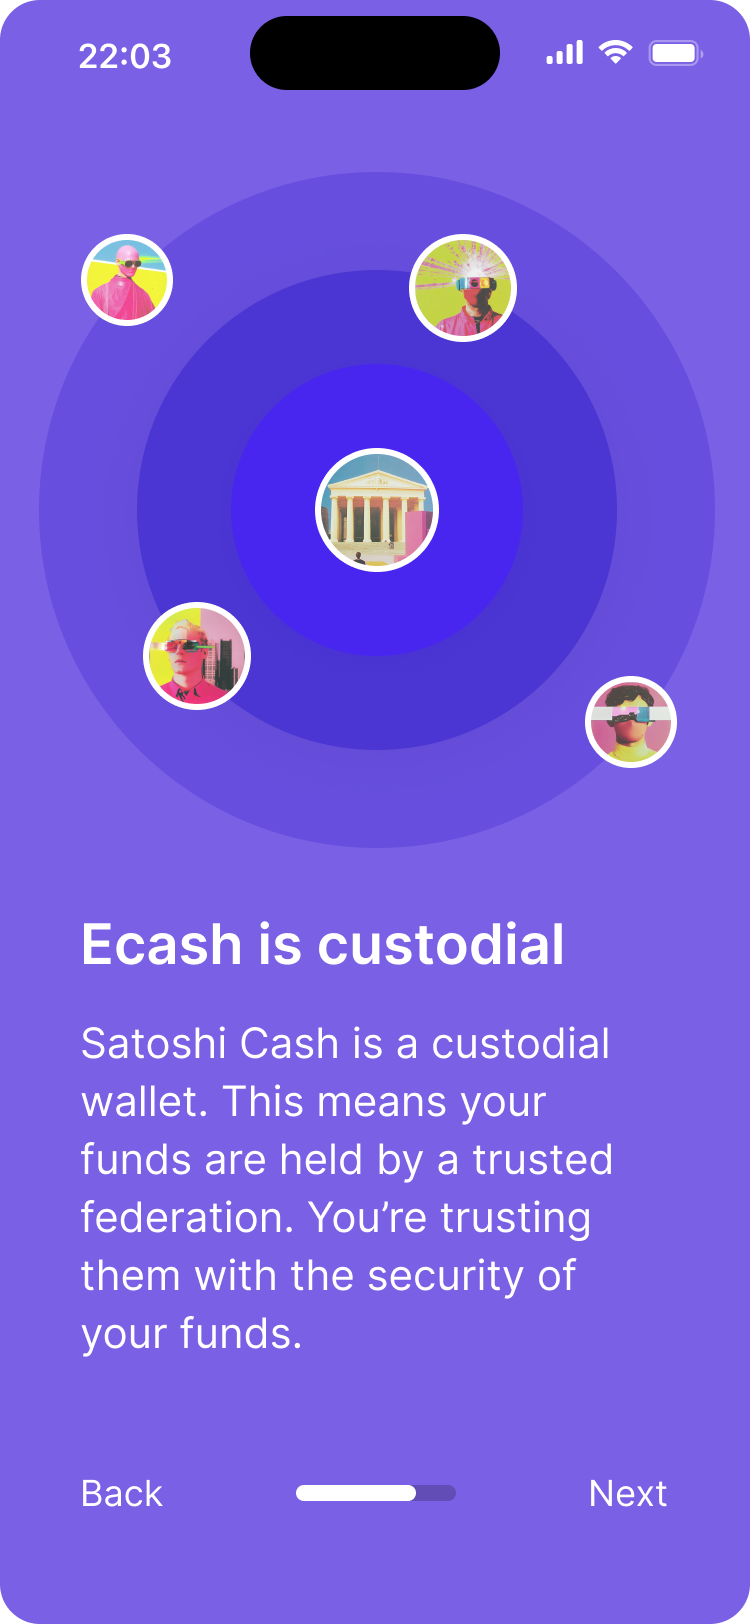
Explanation of ecash custodial model. Users are informed that their funds are managed by a trusted mint or federation, which holds custody over their ecash.
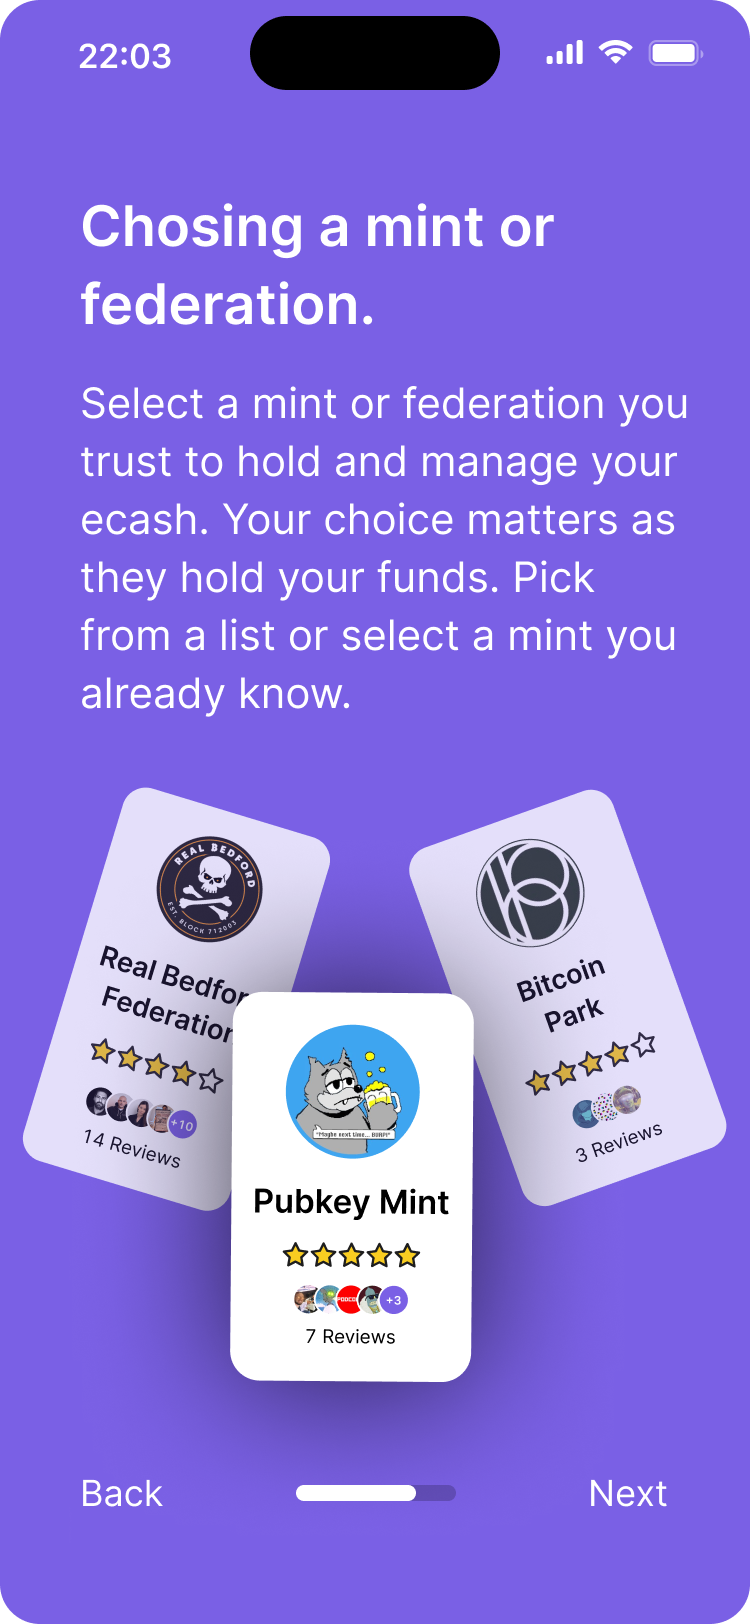
Guidance for selecting a mint or federation to hold your ecash. Users choose based on reviews and trustworthiness.
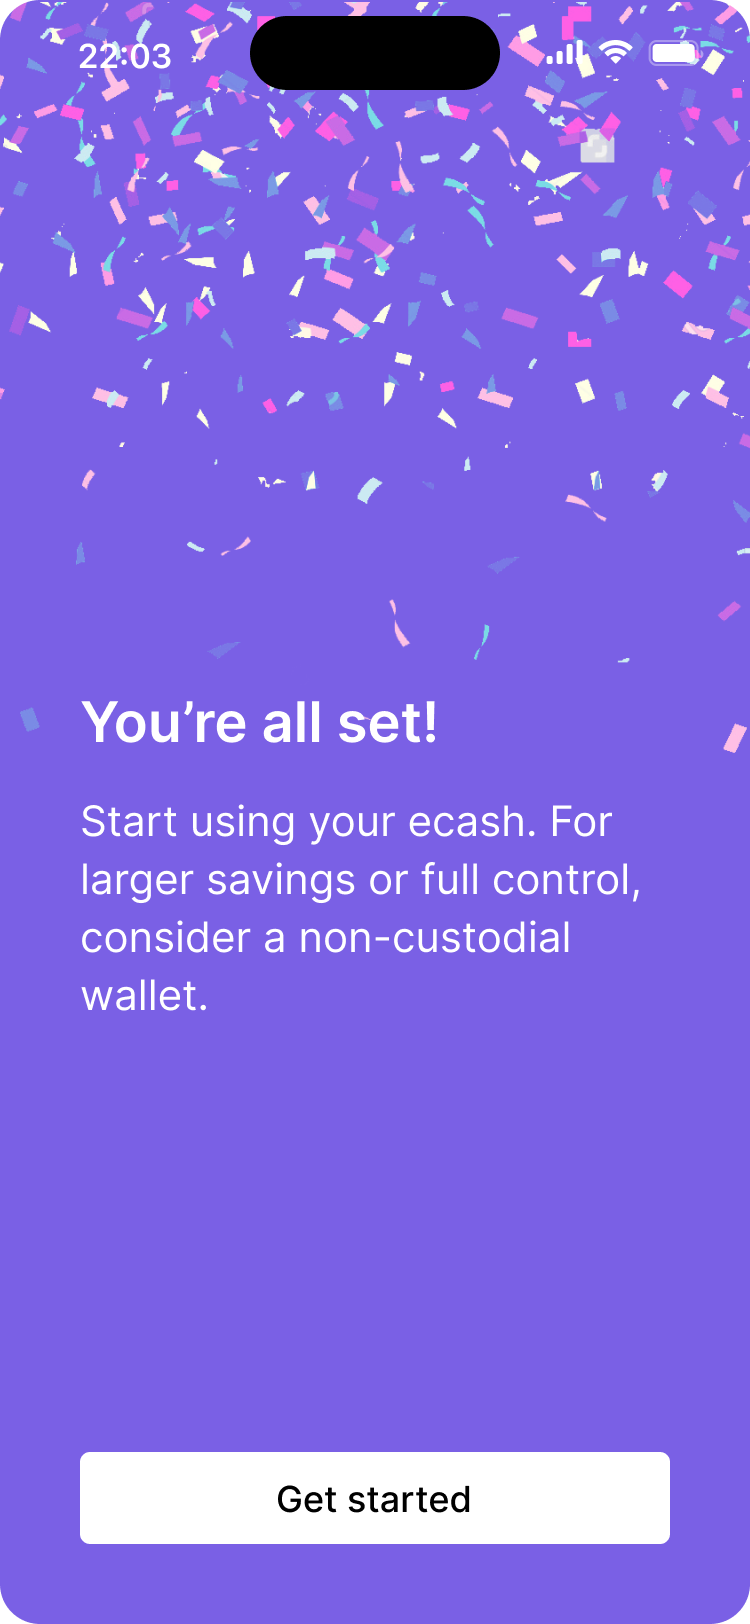
Completion screen celebrating setup success. Users are ready to start using ecash and are advised to consider non-custodial options for larger holdings.
It is recommended to start the onboarding process by explaining the risks associated with ecash and then guide the user through the process of joining their first mint or federation.
Joining unknown mints or federations
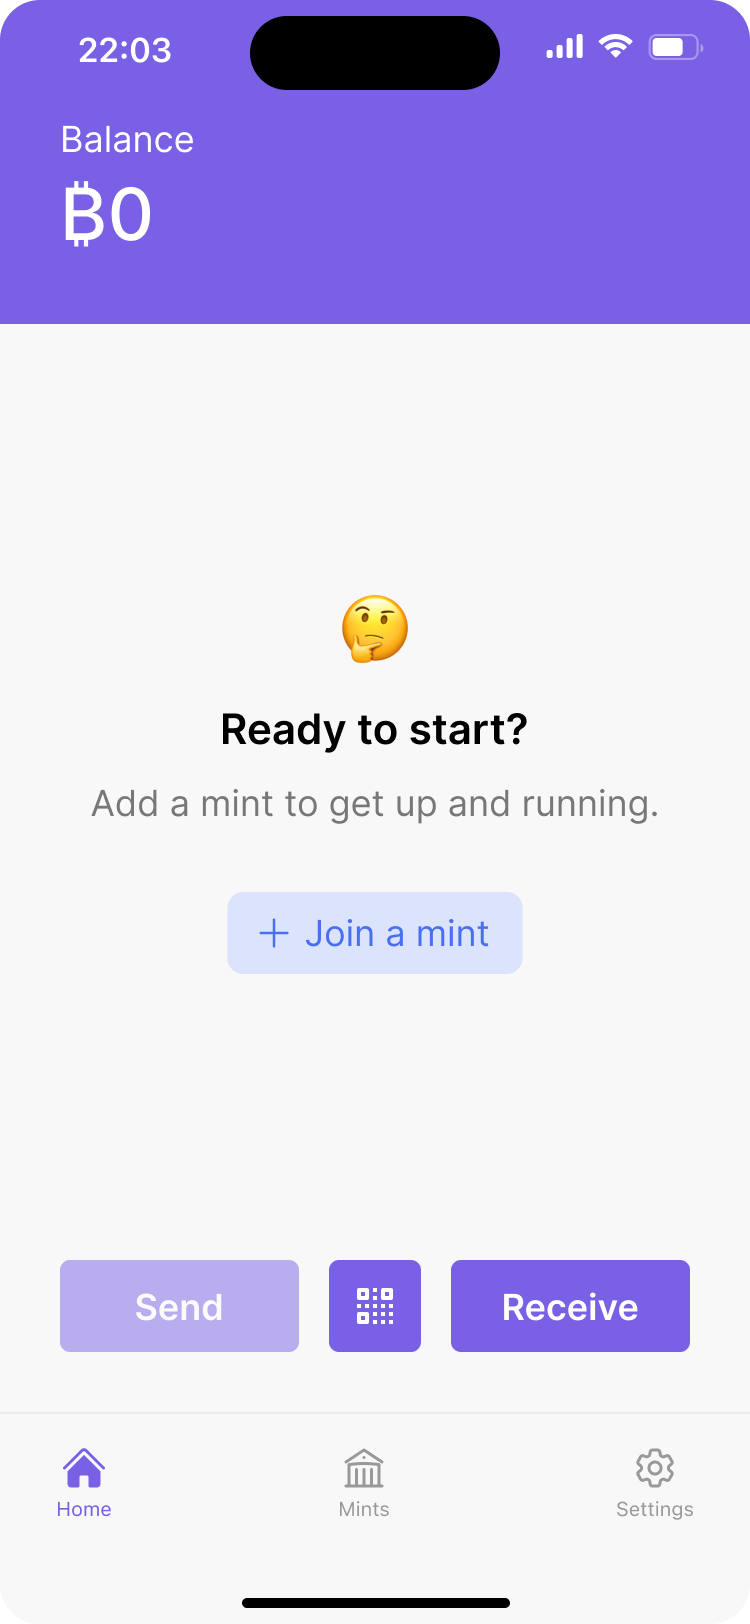
Initial empty state of the wallet’s home screen, prompting the user to join a mint to get started.
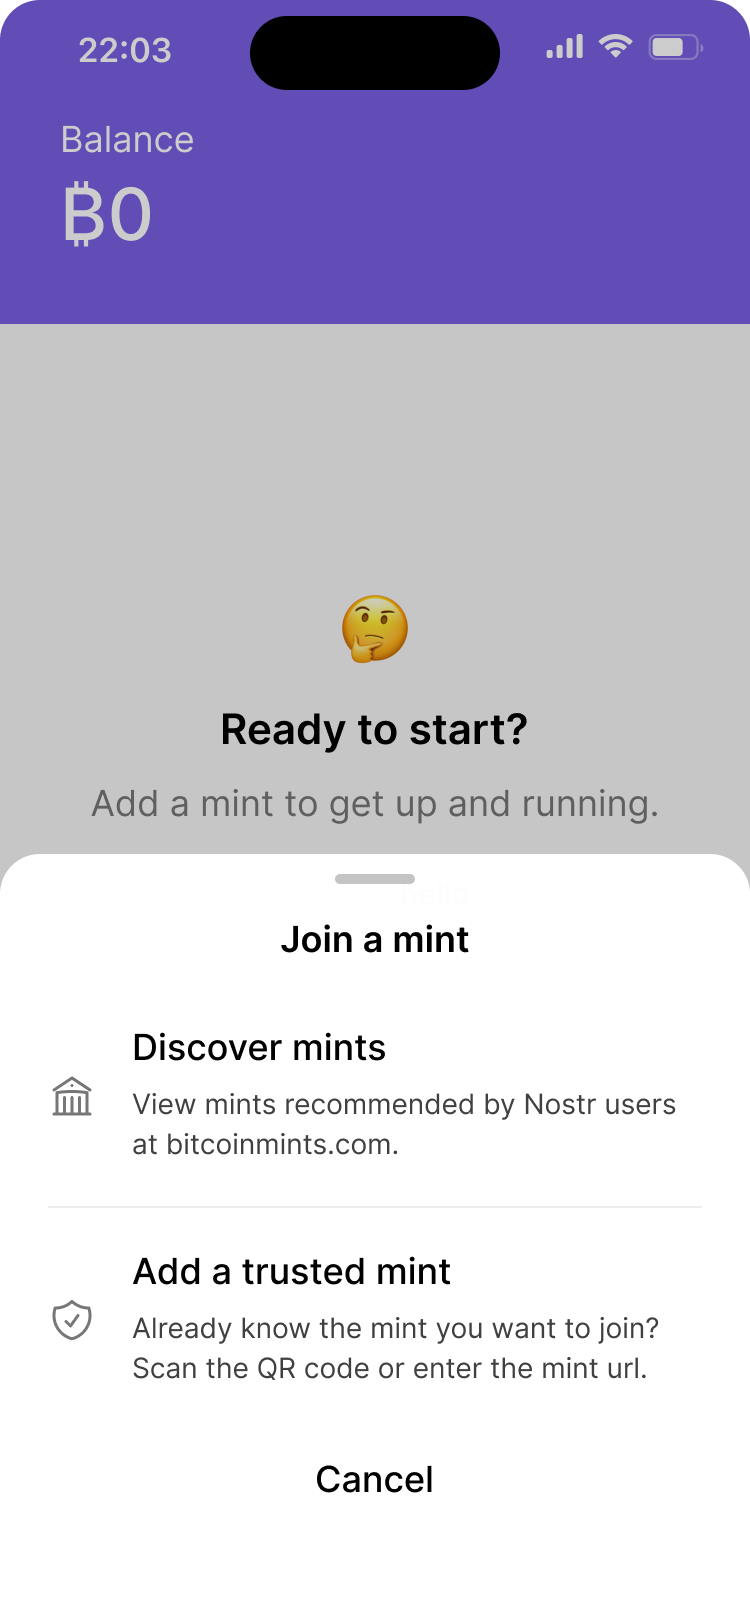
Encourage users to add a mint by offering options to discover recommended mints or add a known mint by scanning a QR code or entering the URL.
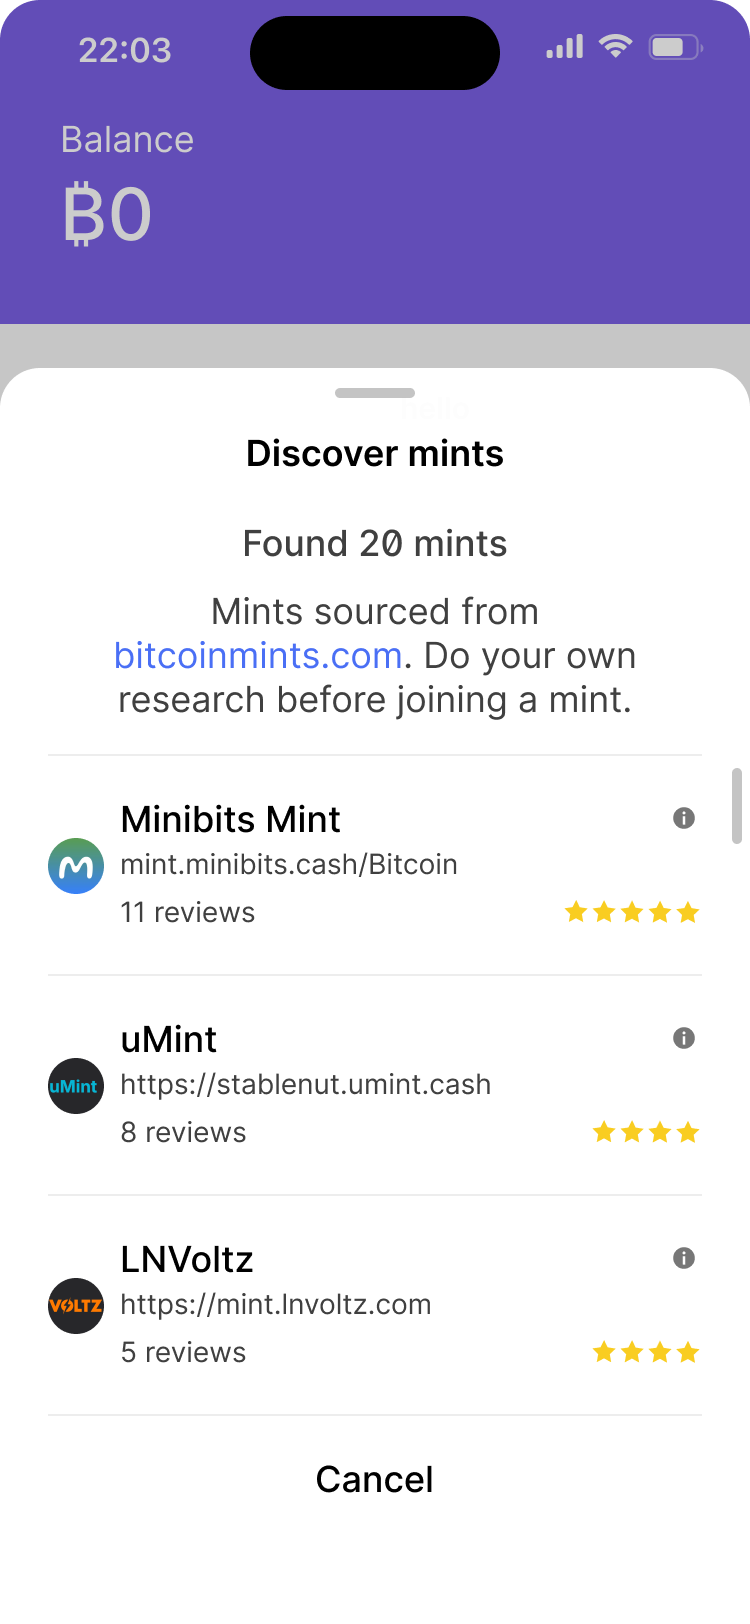
Mint discovery interface displaying a list of available mints with ratings and reviews, encouraging users to do their own research before connecting.
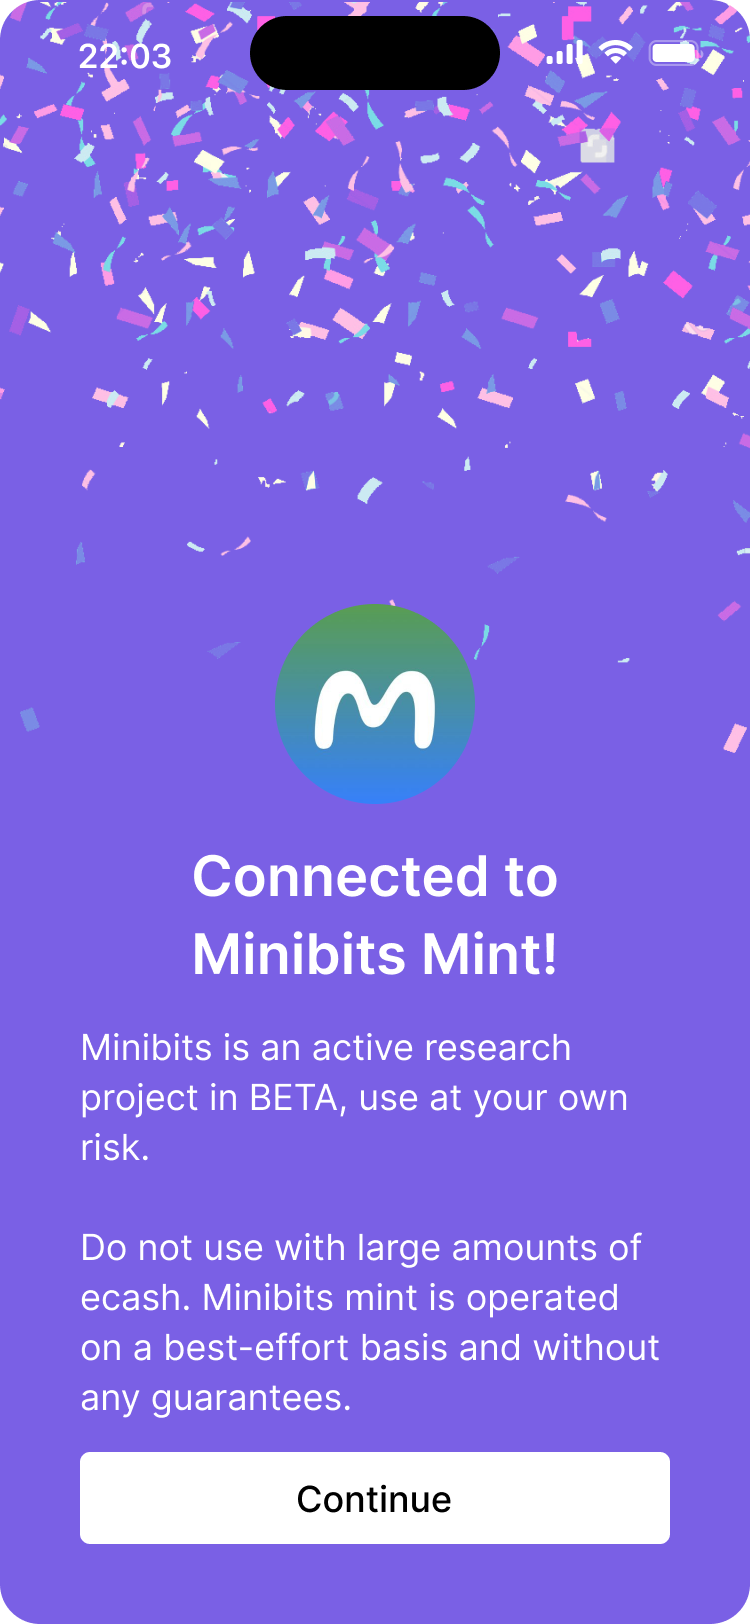
Confirmation screen showing a successful connection to a mint, with a reminder for users to exercise caution and avoid storing large amounts of ecash.
During the inital mint selection screen a wallet could display a list of recommended mints or federations based on the user’s device information, location, and other factors. One current example of this is Bitcoin Mints. Their mint list can be integrated into the wallet so it’s easier for the user to see a list of mints and ratings and make their own decision as to which mint or federation to join.
Joining known mints or federations
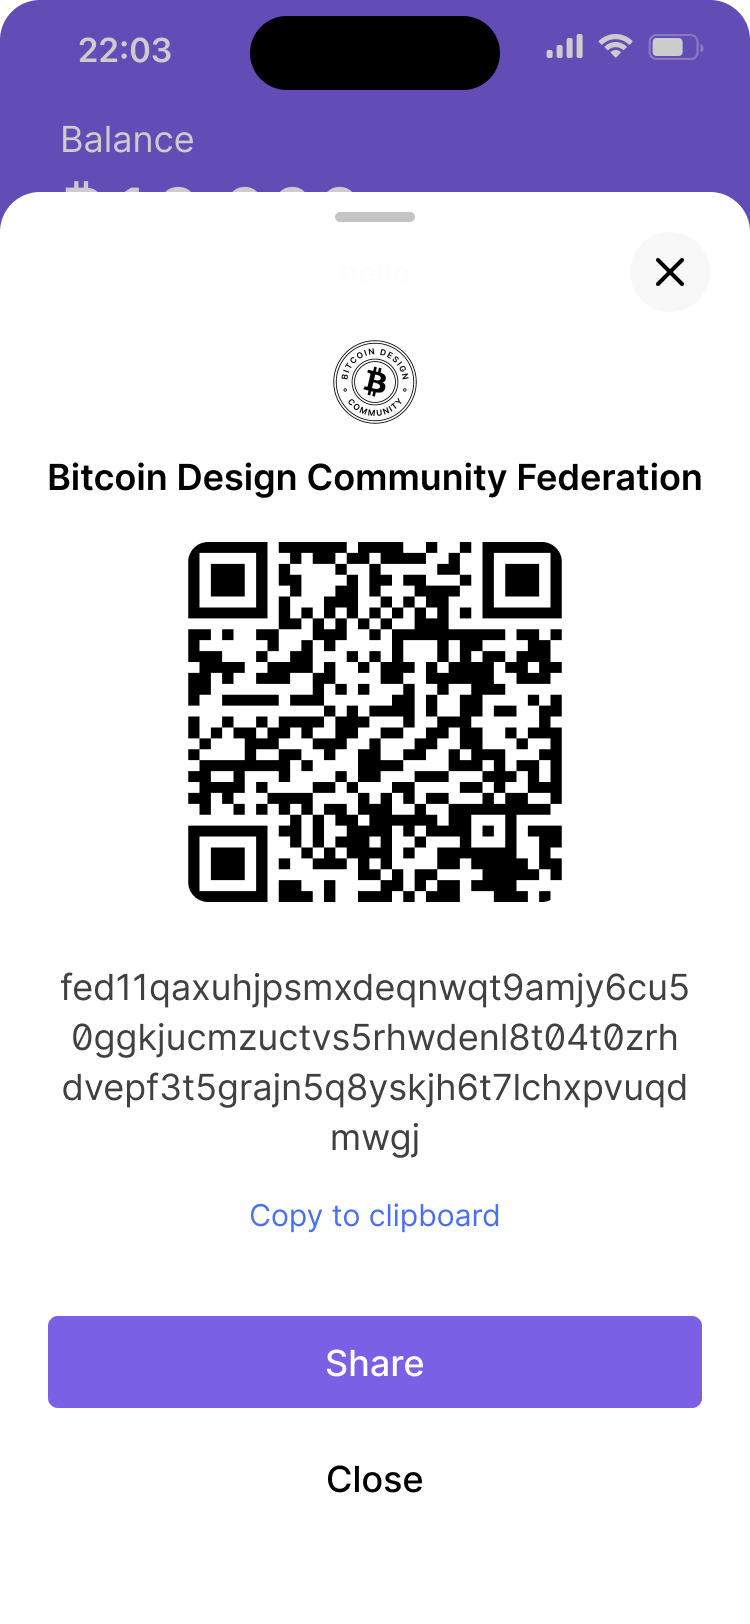
Allow users to join the Bitcoin Design Community Federation by scanning the QR code or copying the community ID. Users can share or copy the code to connect securely to the federation.
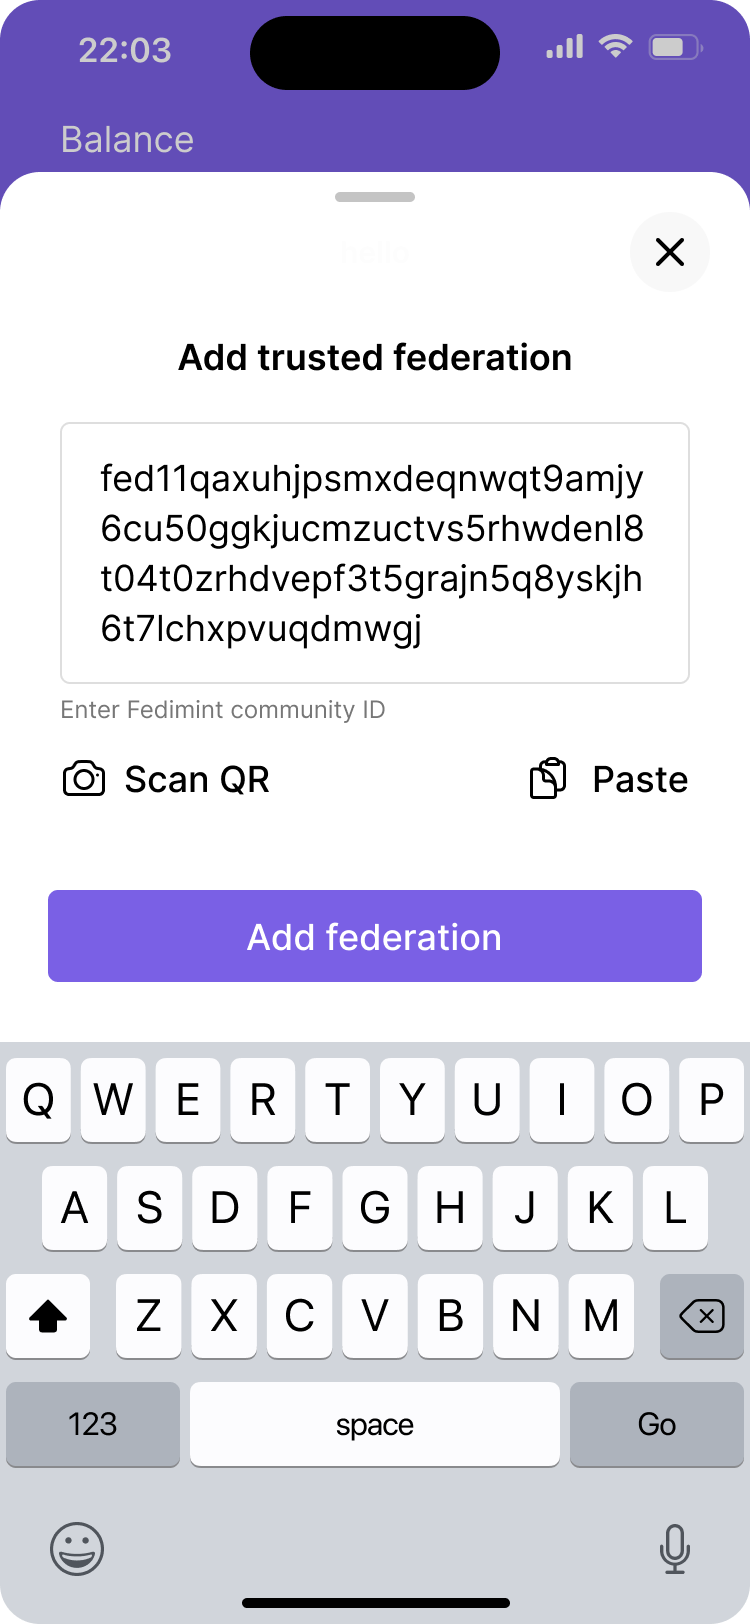
Users manually adds a trusted federation by entering the Fedimint community ID. Users can scan, paste, or type the ID to establish a secure federation connection.
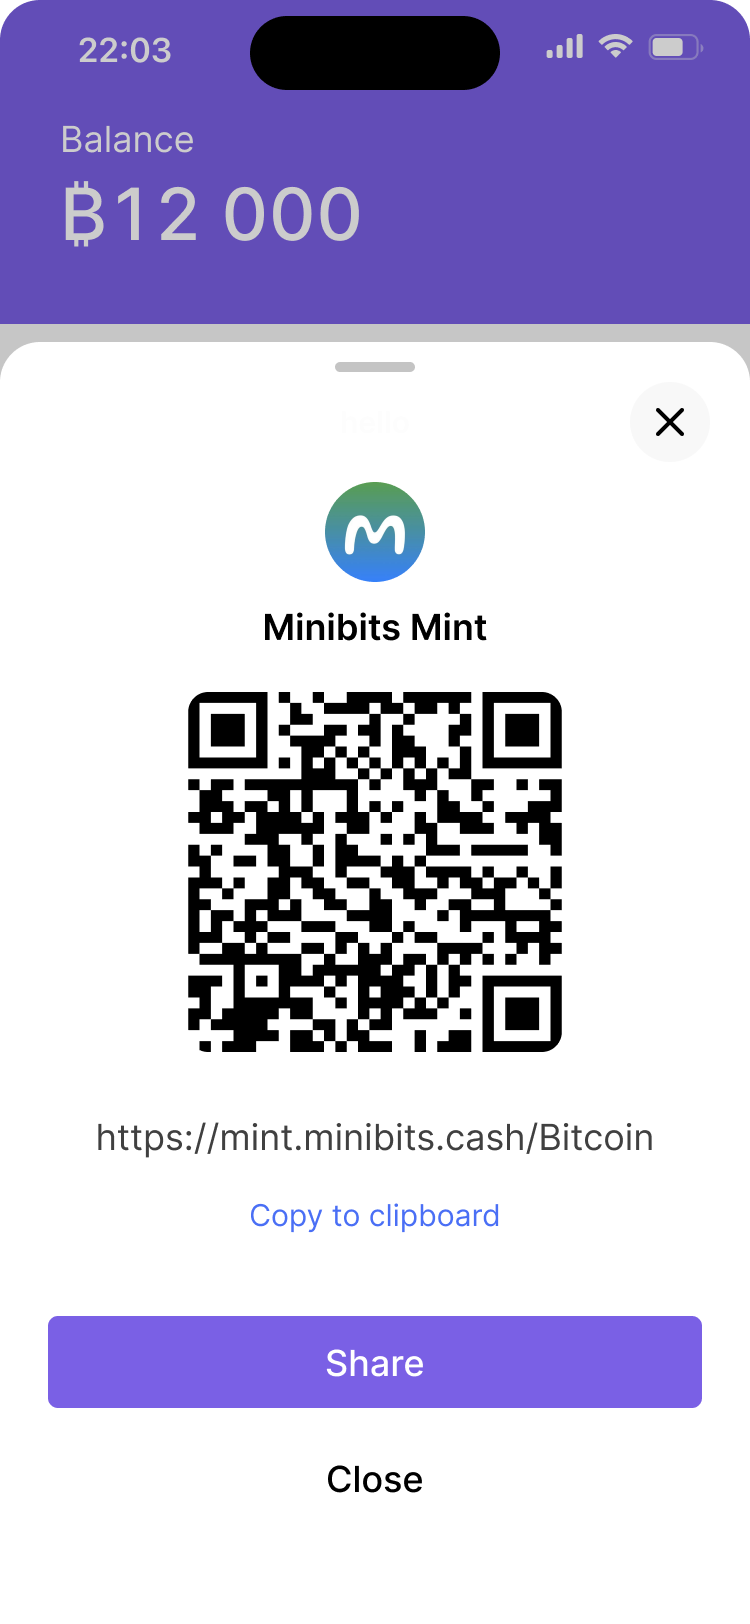
Allow users to connect with Minibits Mint by using the QR code or URL. Also provide access to share or copy the link, making it easy to add this mint as a trusted connection.
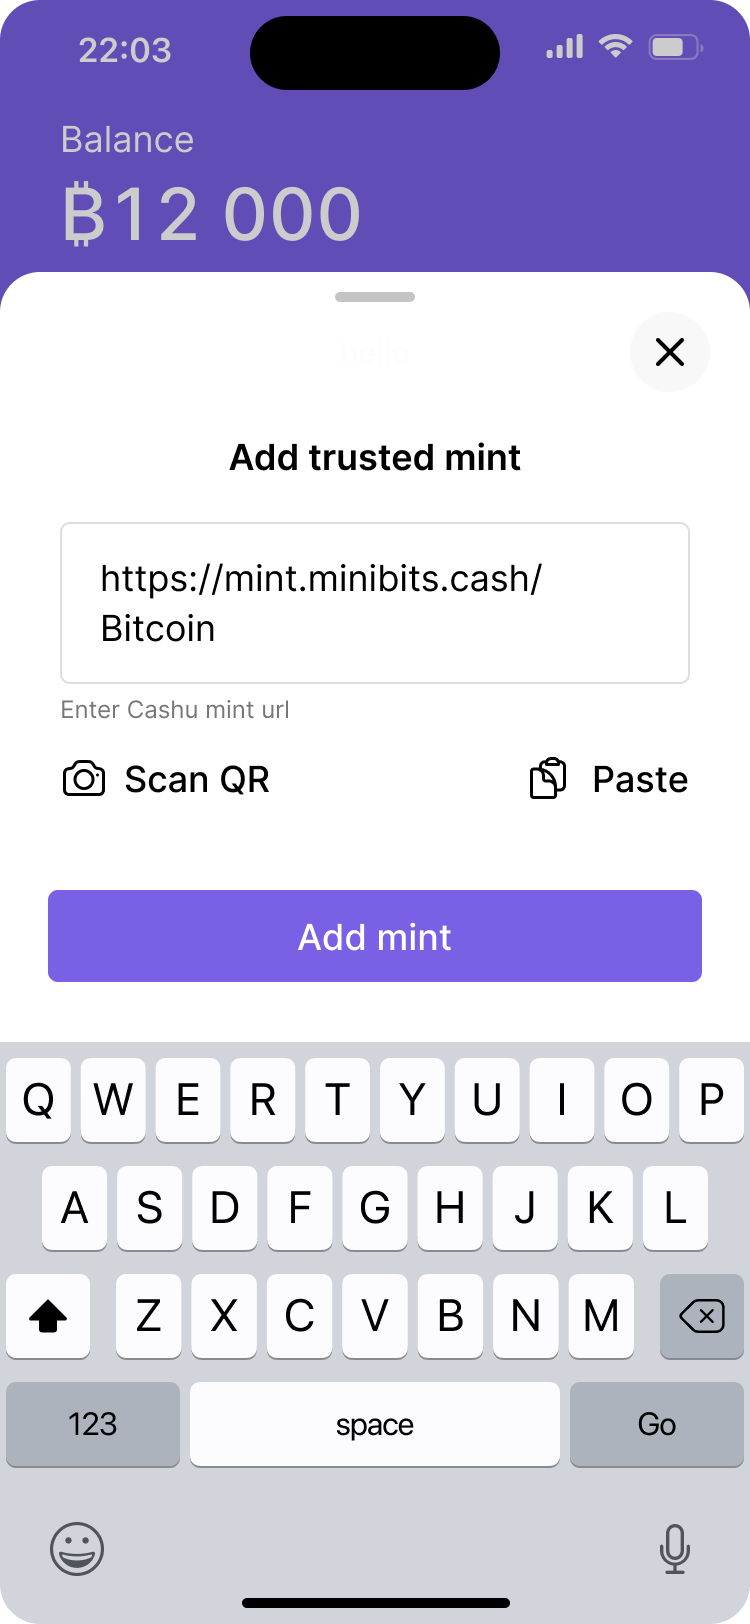
Guide users in adding a trusted mint by entering or pasting a mint URL. Also provide options to scan or paste for quick connection setup.
If a user is already aware of the specific mint or federation they want to join, wallets should support the ability to manually enter the mint name or address or scan a QR code to add the mint or federation to their wallet.
Web of trust
Applications should try to leverage webs of trust when displaying lists of mints. For example, Bitcoin Mints allows users to login with their nostr key and then see filter the list of mints by ratings left by users they are connected to. This allows for a way of discovering mints that are recommended by their network peers.
Multiple mint or federation display
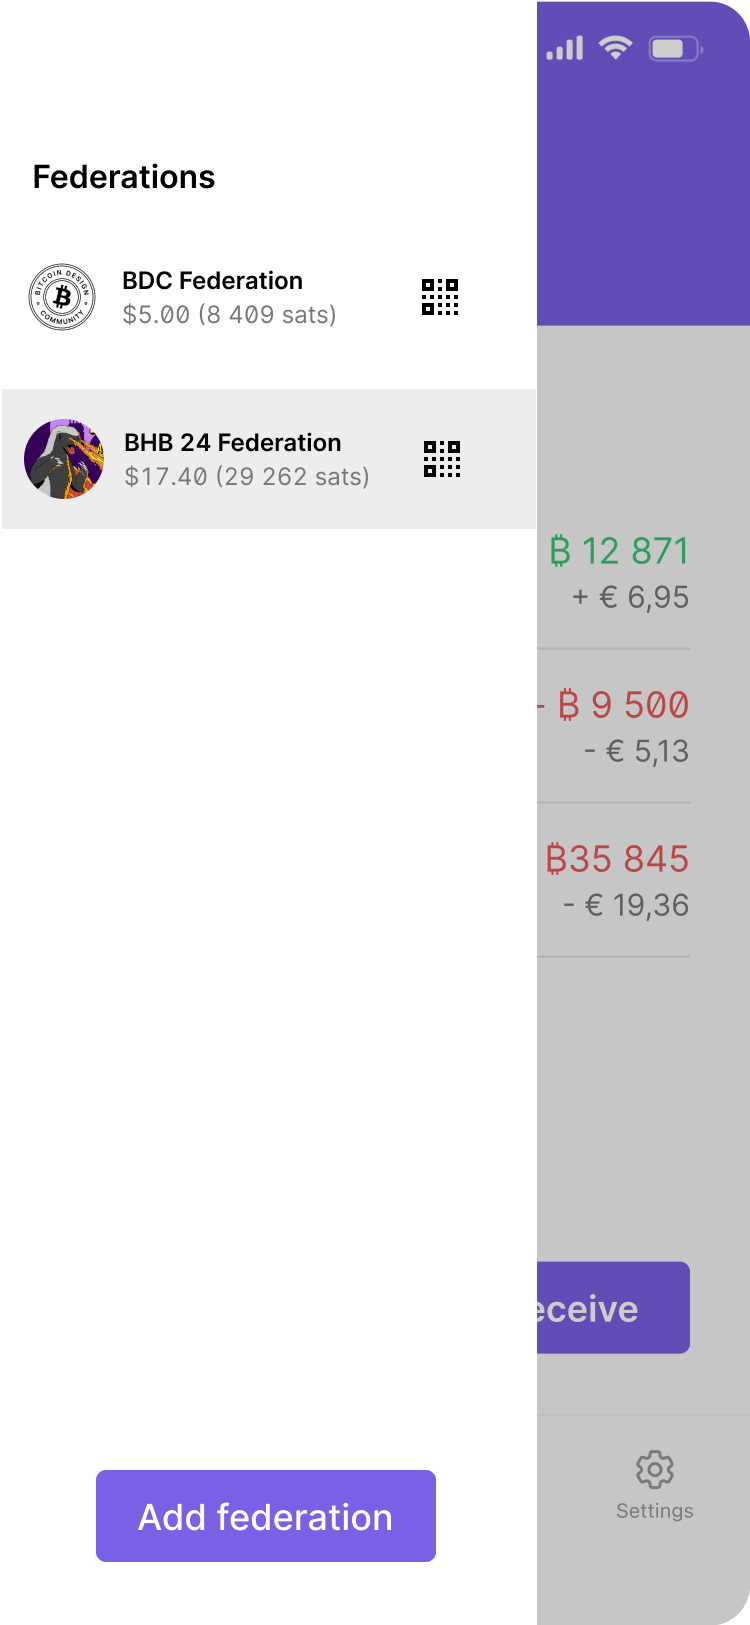
Allow users to easily invite others to a mint or federation, by using well-placed QR codes containing the federation’s URL.
Cashu mints with mint addresses displayed.
When displaying multiple mints or federations in a bitcoin-backed ecash application, there are several best practices to consider:
-
Clear hierarchy and organization: Ensure that mints or federations are organized in a way that is easy for users to navigate. Group mints by relevance, trust level, or frequency of use, and consider using sorting or filtering options to help users find the right mint or federation quickly.
-
Prominent metadata display: Use metadata fields like mint name, icon, URL, and description, to give users insight into each mint or federations identity. Display this information prominently, so users can easily verify the authenticity and relevance of each mint or federation.
-
Quick mint access: Provide easy access to mint or federation details directly from the mint or federation list. This allows users to interact with mints or federations more fluidly without needing to navigate through multiple screens.
Default mint
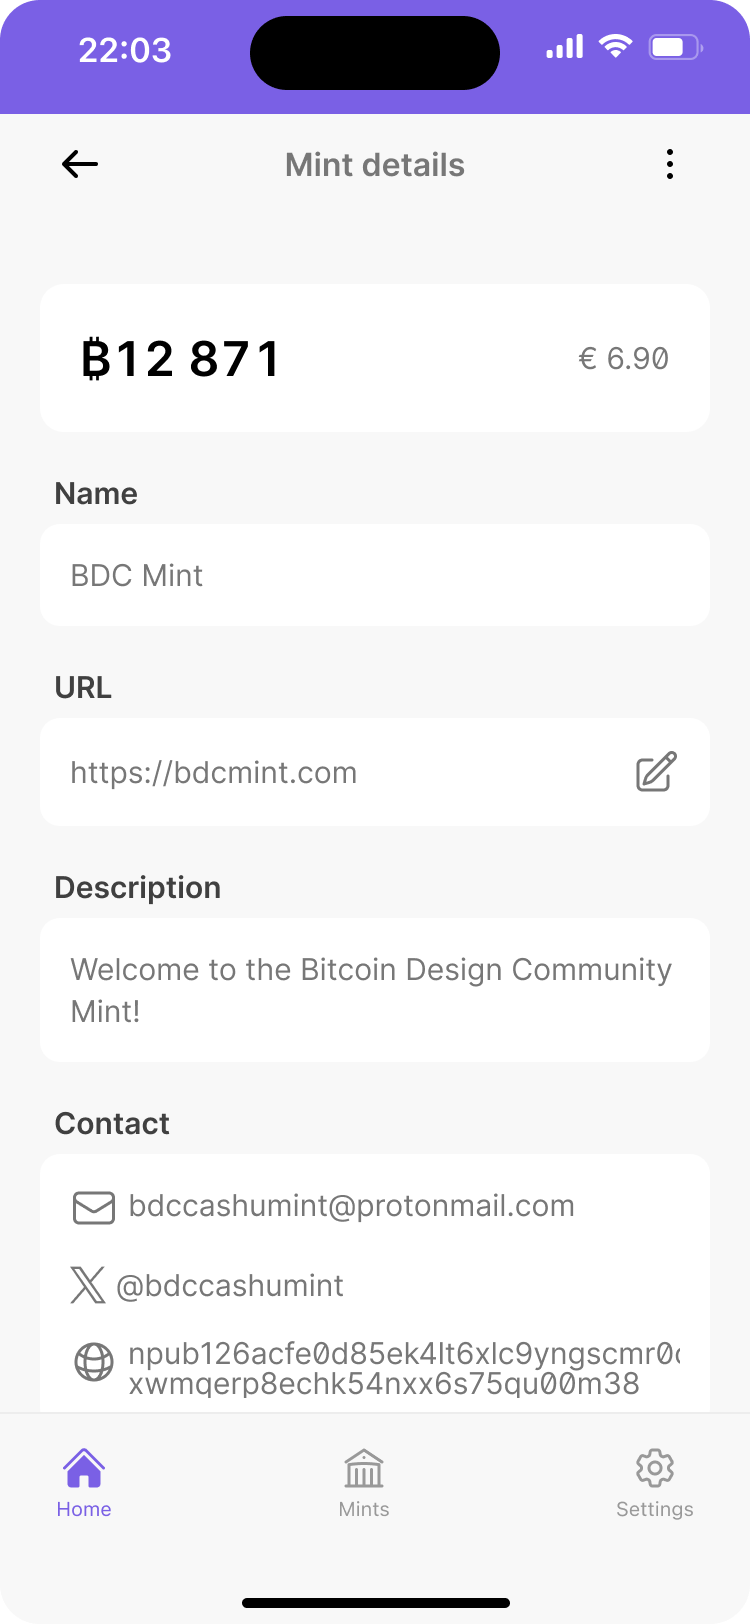
Cashu Mint metadata fields displayed in a wallet interface.
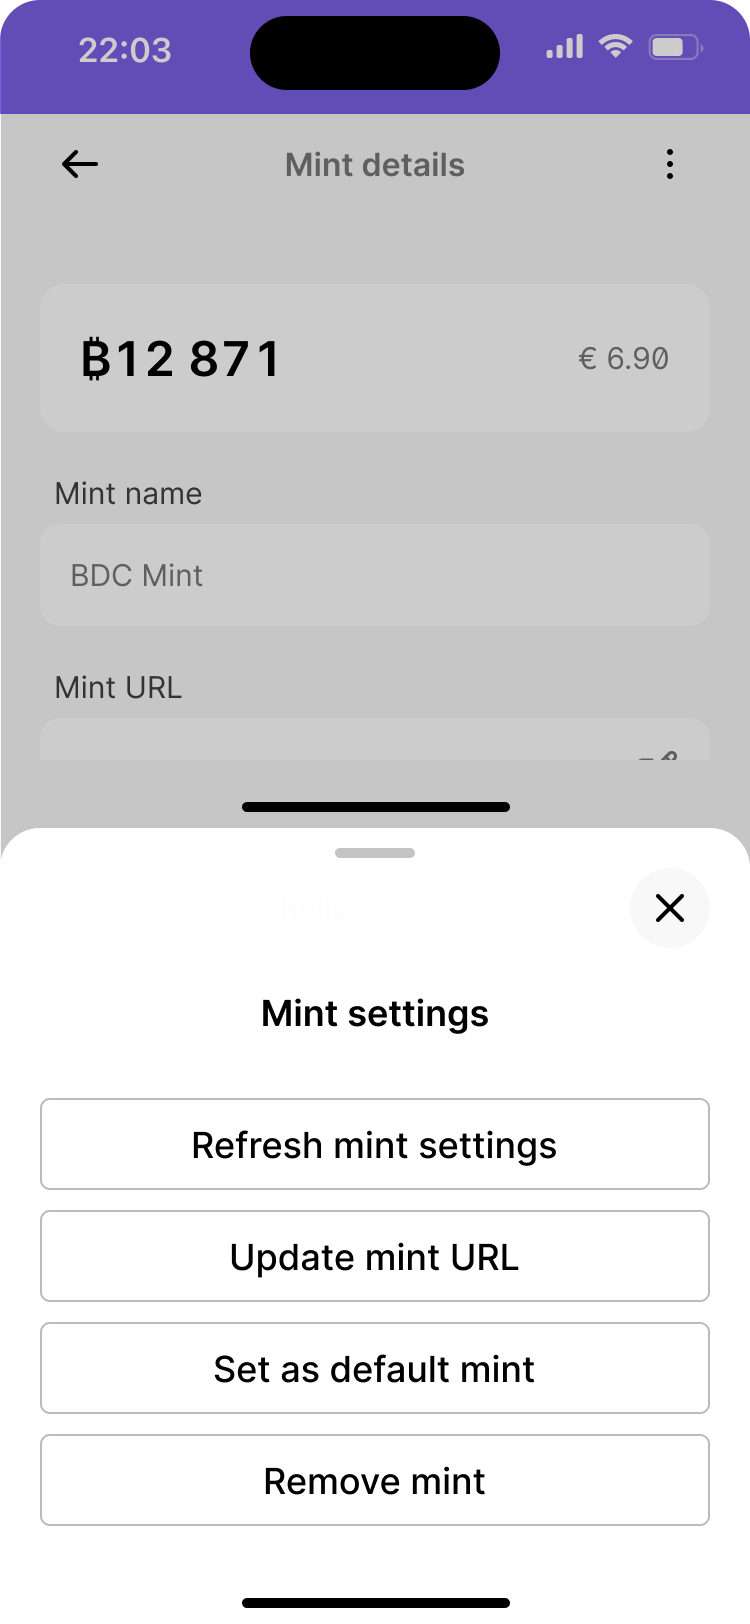
Advanced mint operations like setting a default mint, updating mint url, and removing a mint.
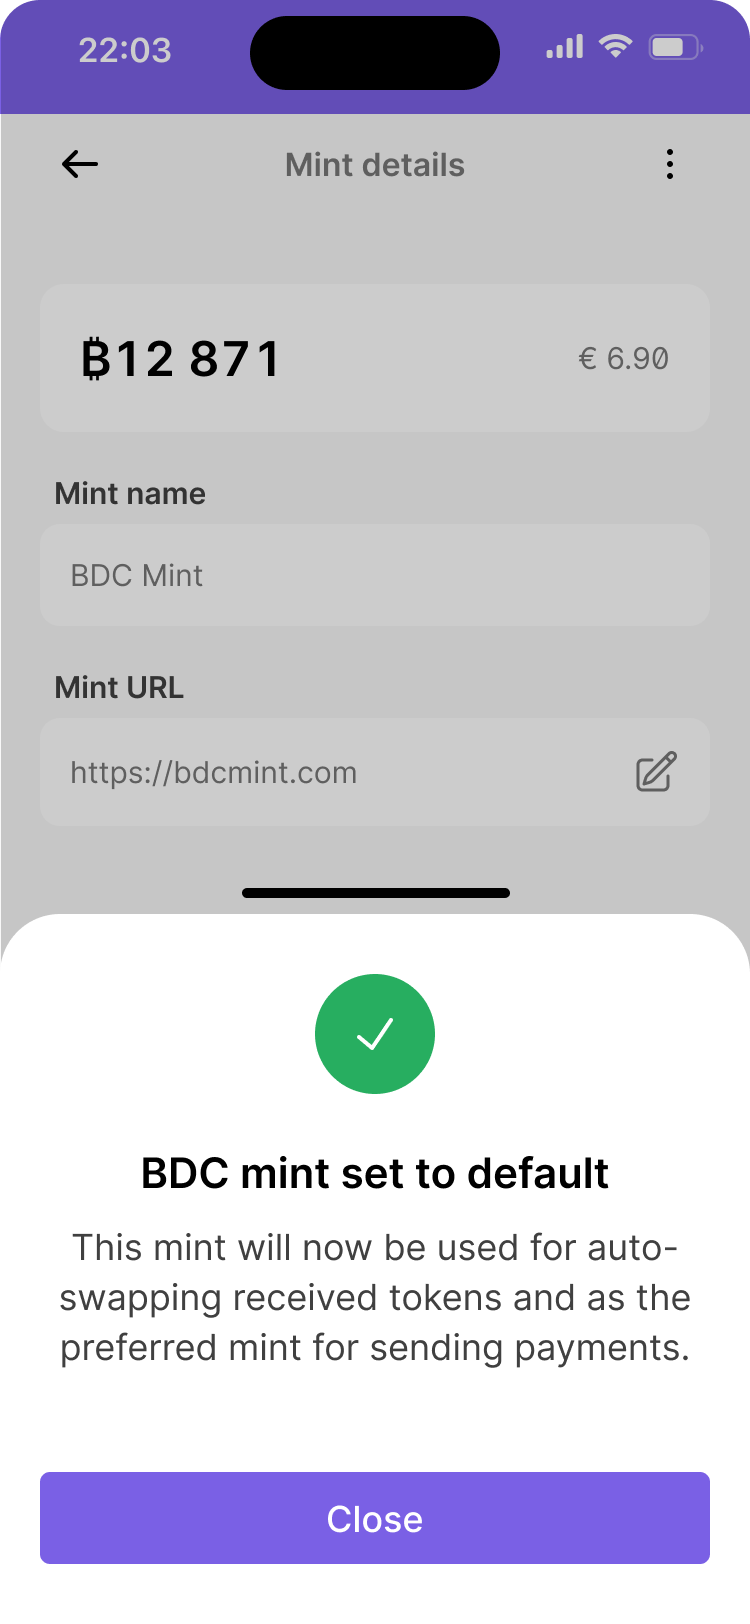
Success message explaining that the default mint will be used for auto-swapping received tokens and as the preferred mint for sending payments.
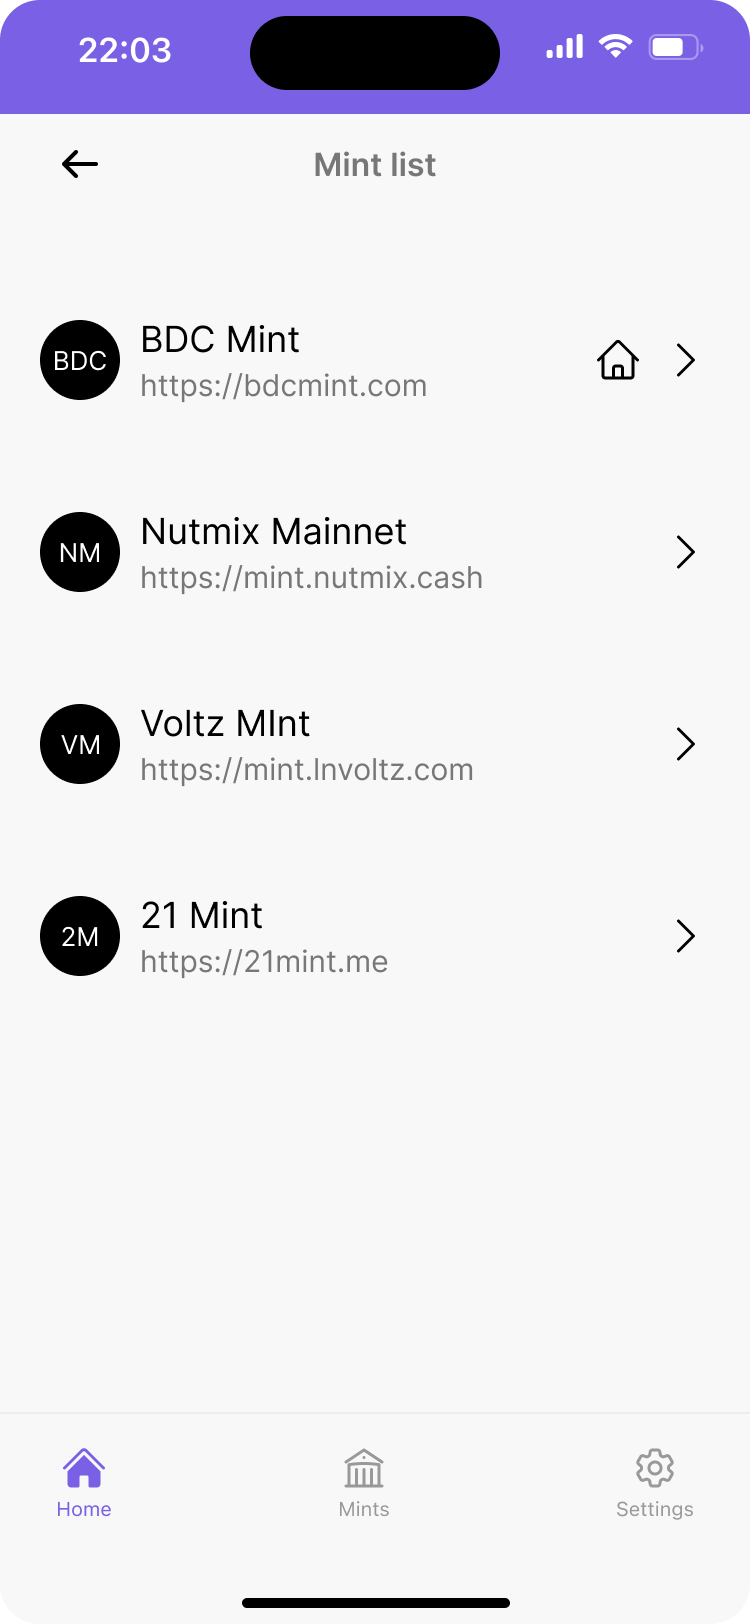
Default mint highlighted by a home icon.
Users may prefer to use a trusted mint for their payments. By allowing them to select a default mint, you simplify their experience and reduce the risk of exposure to a potentially malicious mint. Additionally, consider offering auto-swap preferences.
Auto-swapping to a default mint
User scans or receives an ecash token
User scans or receives an ecash token.
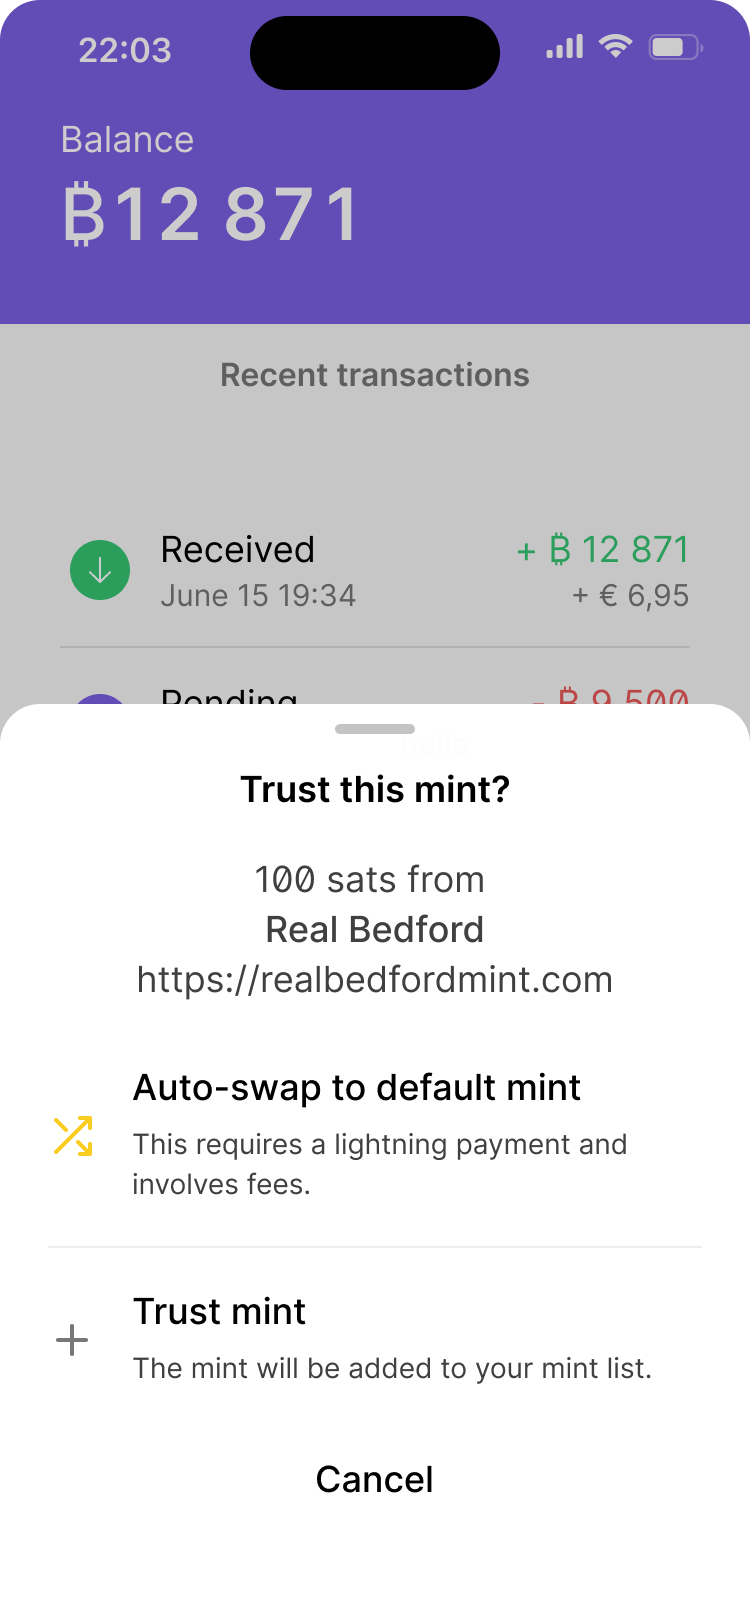
For privacy-focused wallets, ask users to confirm trust or offer auto-swap to their default mint when receiving ecash from an unknown mint.
Wallets can provide the option to automatically swap ecash from an unknown mint to their default mint or federation. This optional feature can simplify payments by routing all ecash through the assigned default mint or federation.
Auto-swapping involves fees
It’s important to inform users that swapping requires a a lightning payment and involves fees. The amount of fees depends on the amount of ecash they want to swap and the current network conditions.
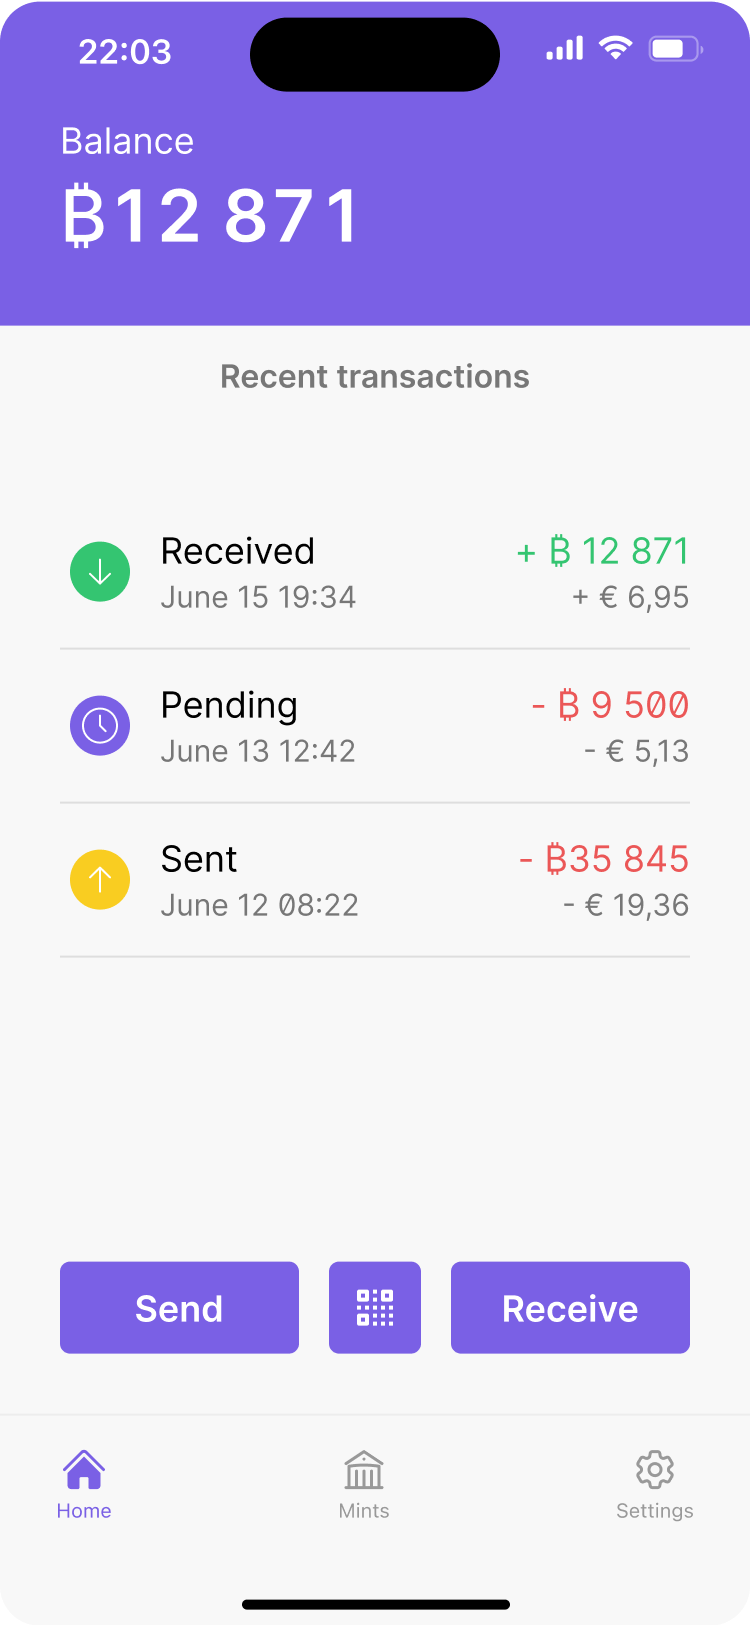
Pending tokens
Received, pending, and sent transaction each with their own visual indicator.
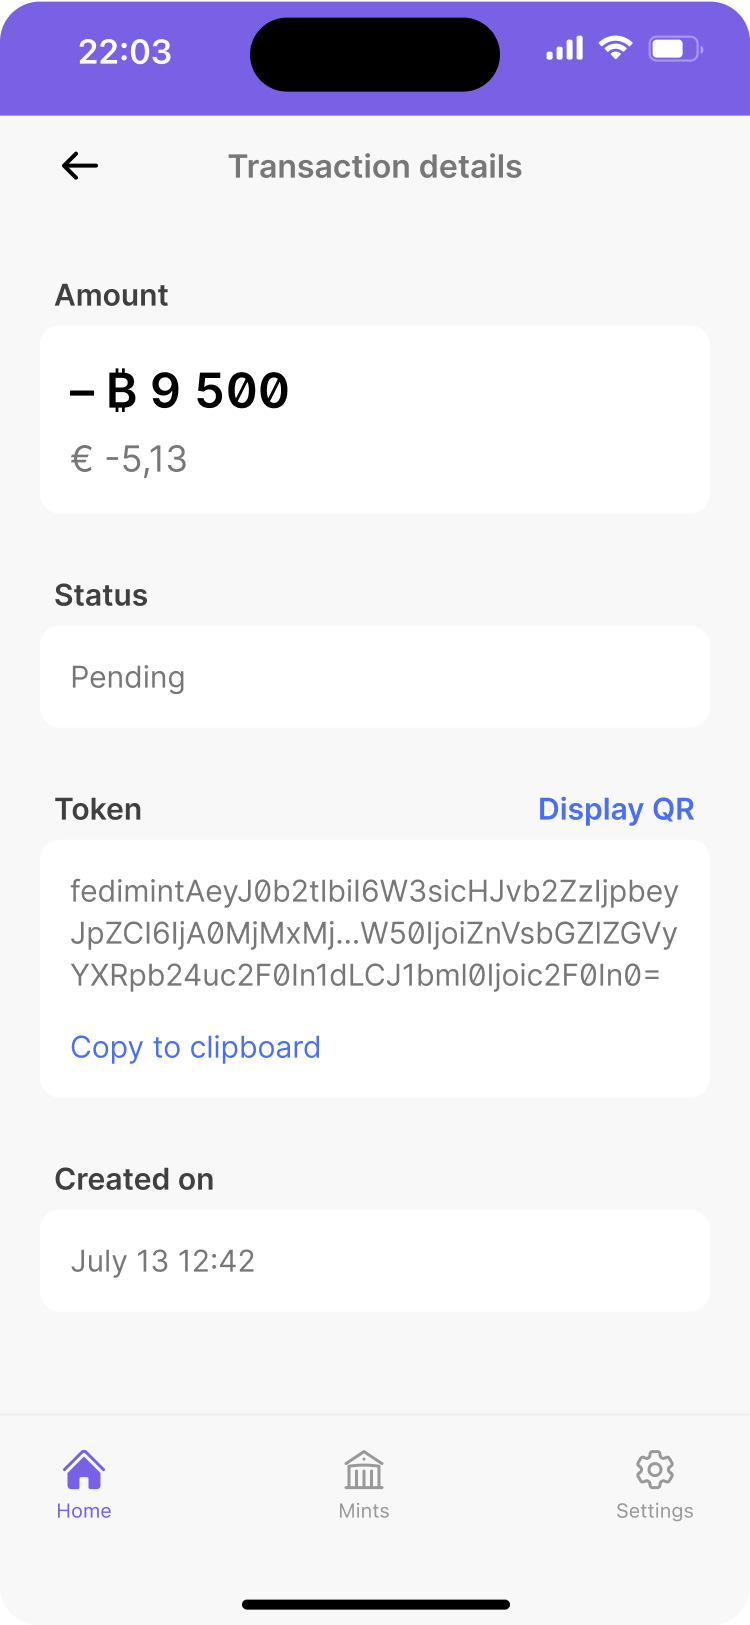
Expanded view of a pending payment.
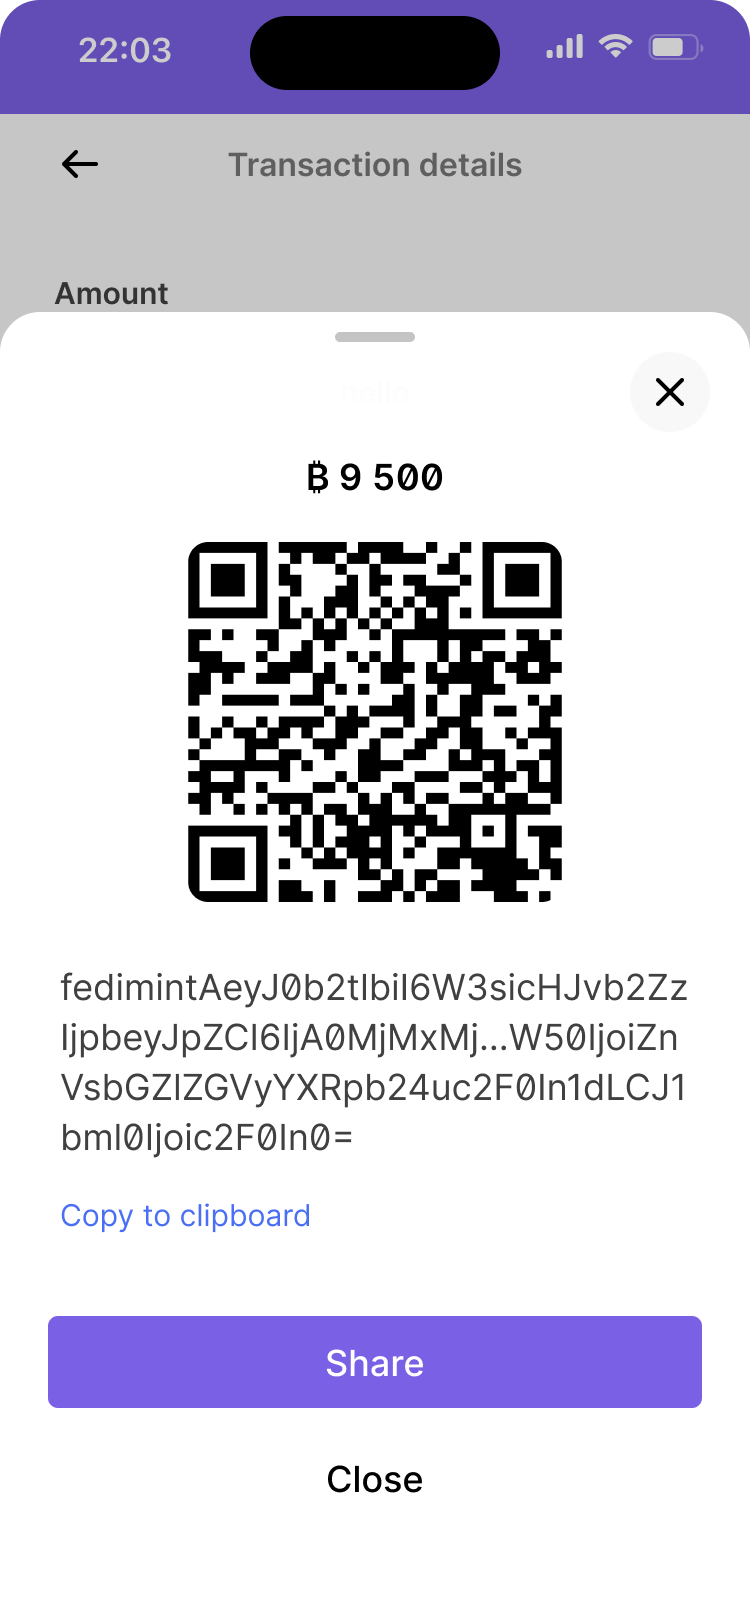
QR code for a pending token.
It’s useful to display generated tokens in the payment history along with their status—whether pending or redeemed. While token is pending, anyone with the token string can claim it. This helps users quickly assess their payment status. Providing the ability to expand on a token to view details and take actions like resending or redeeming is also important. This feature becomes particularly valuable if a token was lost or never claimed.
Backup
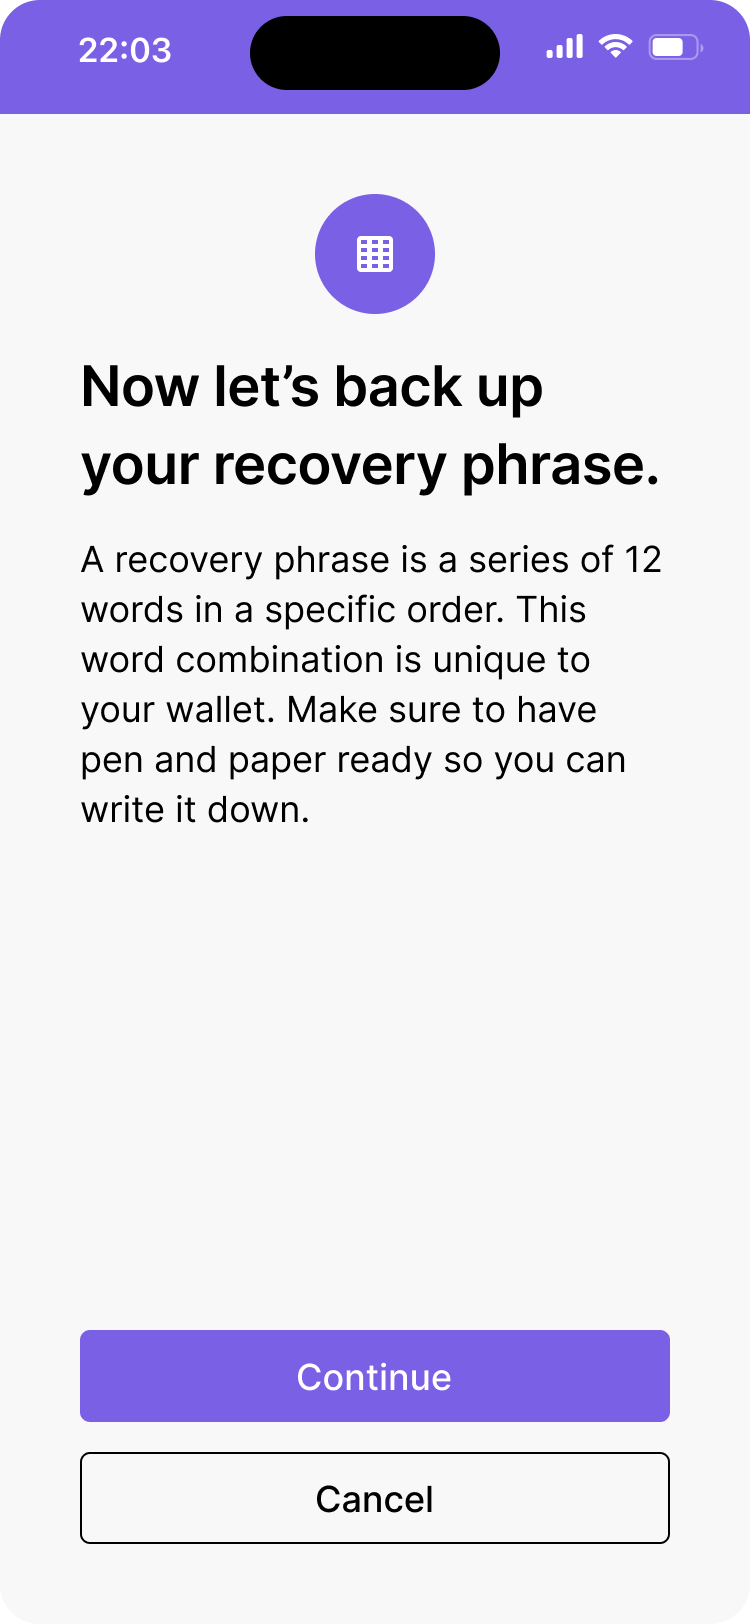
Explain what a recovery phrase is.
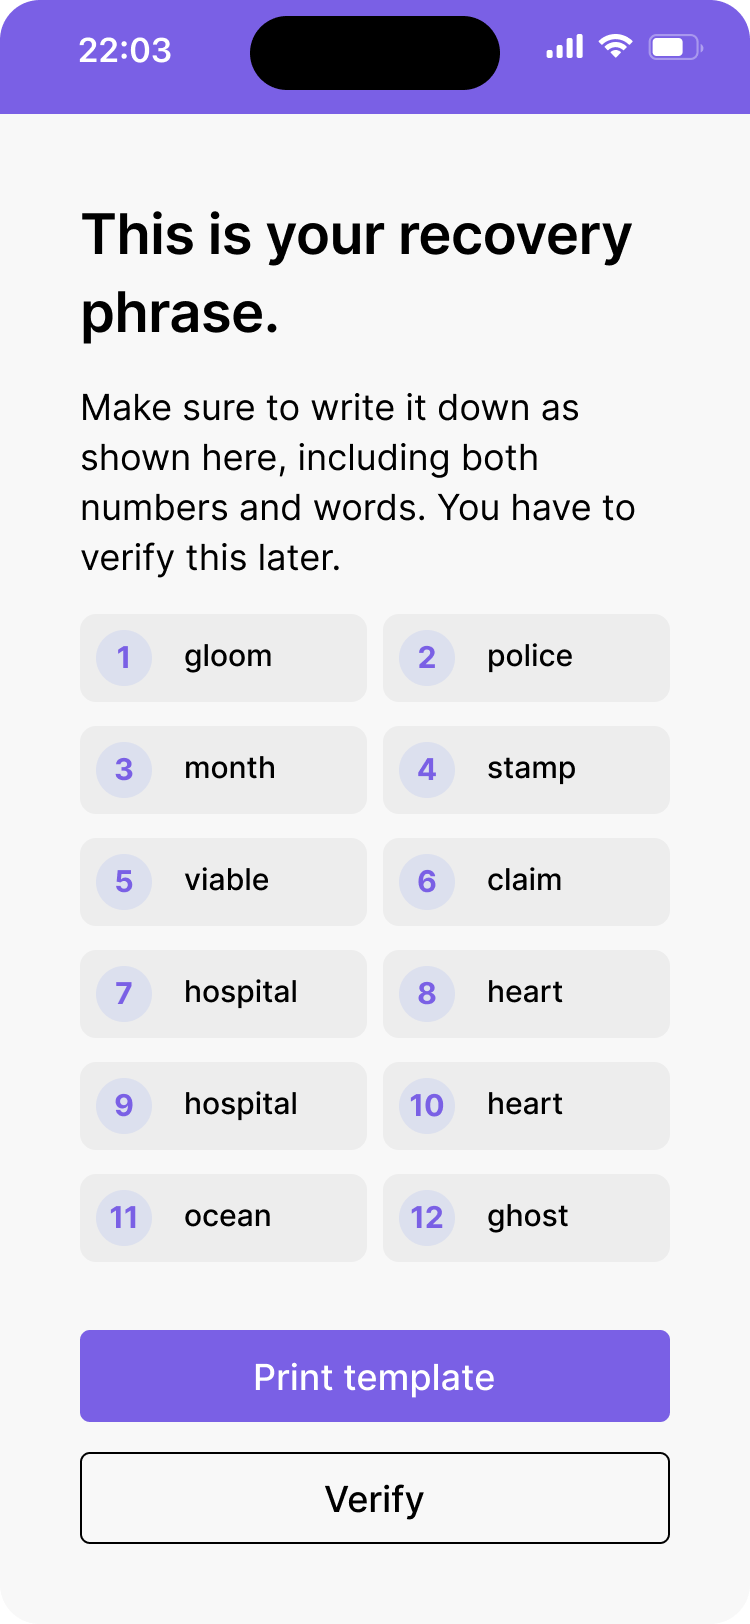
Give the user an option to download a print template.
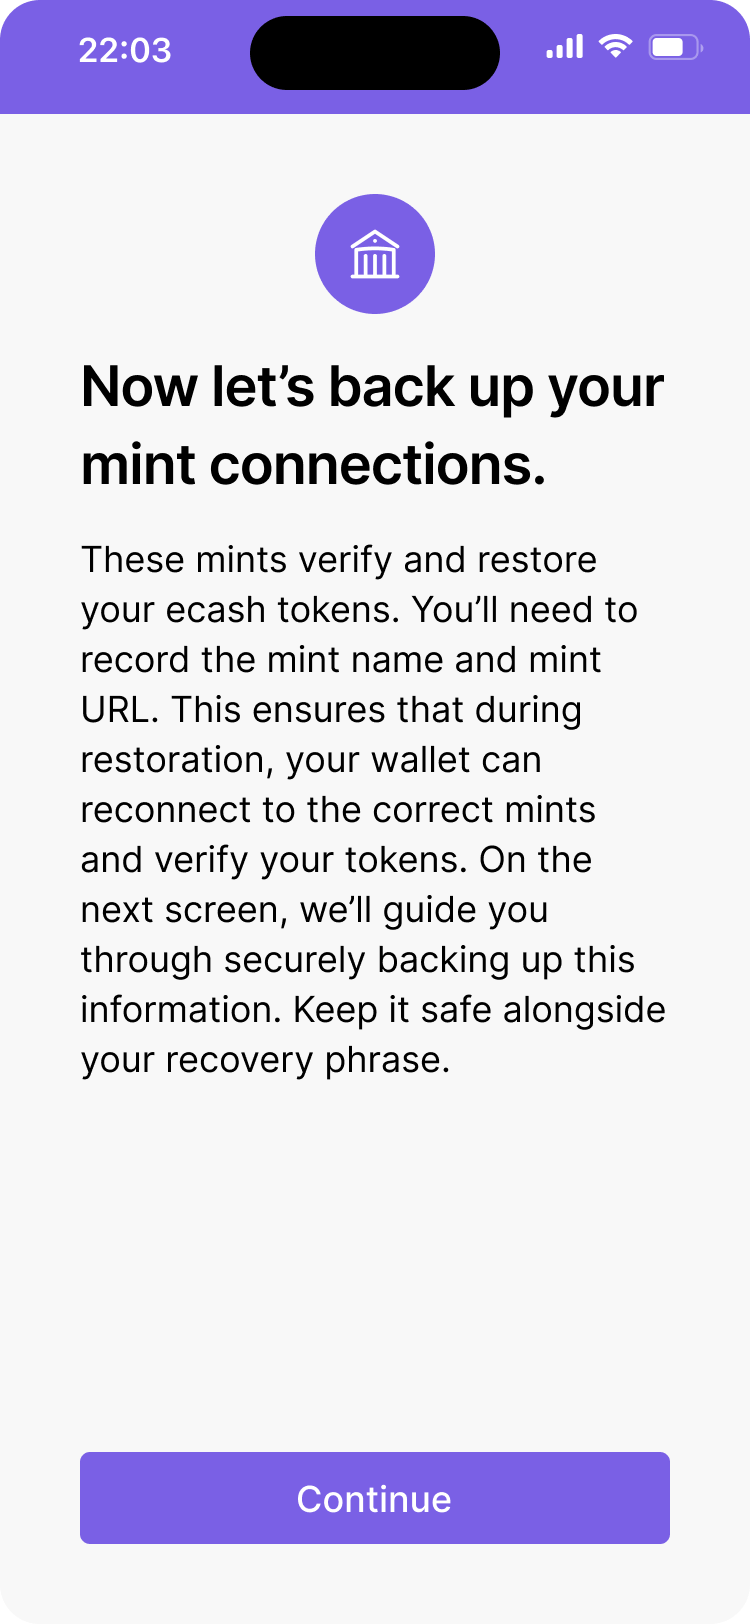
Explain to the user that they need to back up their mints by providing the mint url.
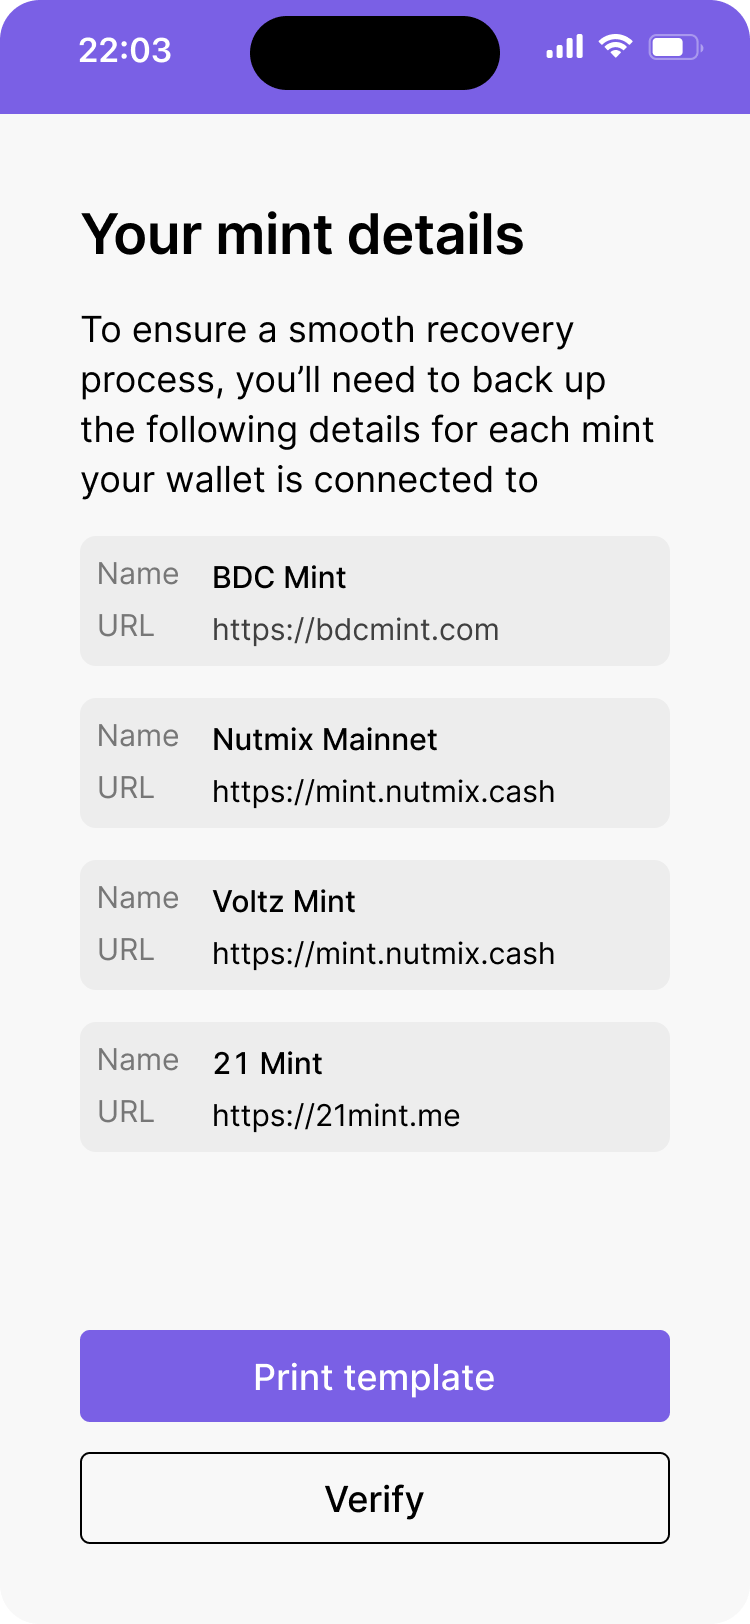
Give the user an option to download a print template.
Both Fedimint and Cashu support the ability to use a seed phrase to backup and restore ecash tokens. Users are advised to store their seed phrase securely. It is crucial to keep this seed phrase in a safe, physical format (such as written on paper) and stored in a secure location to prevent unauthorized access or loss. The best practices in the Backup & recovery section also apply to ecash applications and wallets.
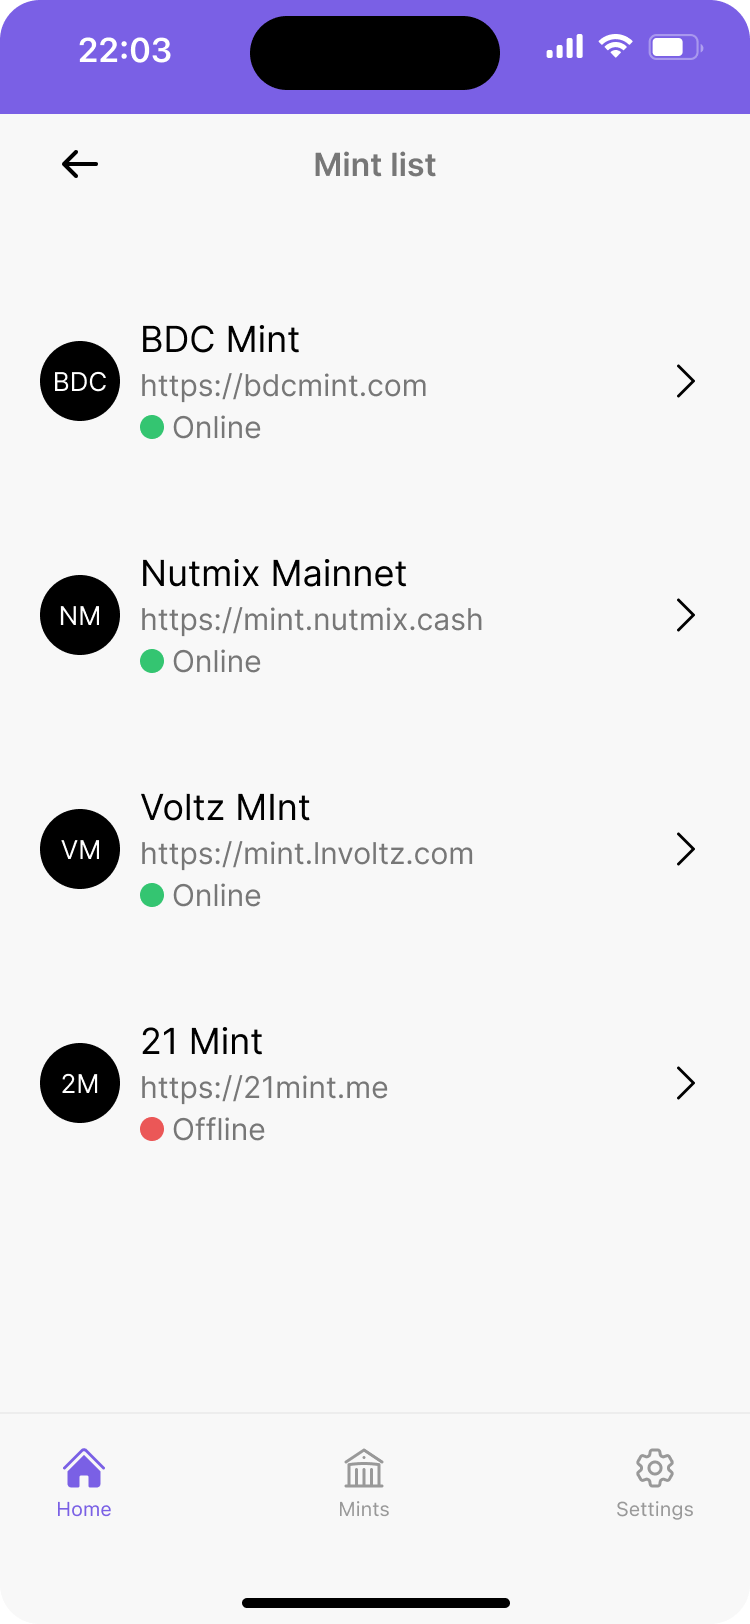
Mint information needed
Instruct the user to keep a record of the mints or federations they are connected to. This can be done by writing them down or, since the mint list is not sensitive information, the wallet can offer to save the list of mints on cloud storage. During the restoration process, users will need to reconnect to these specific mints or federations to re-verify their ecash. Without this information, they will not be able to fully restore their wallet.
Restore

Explain what a manual restore is.
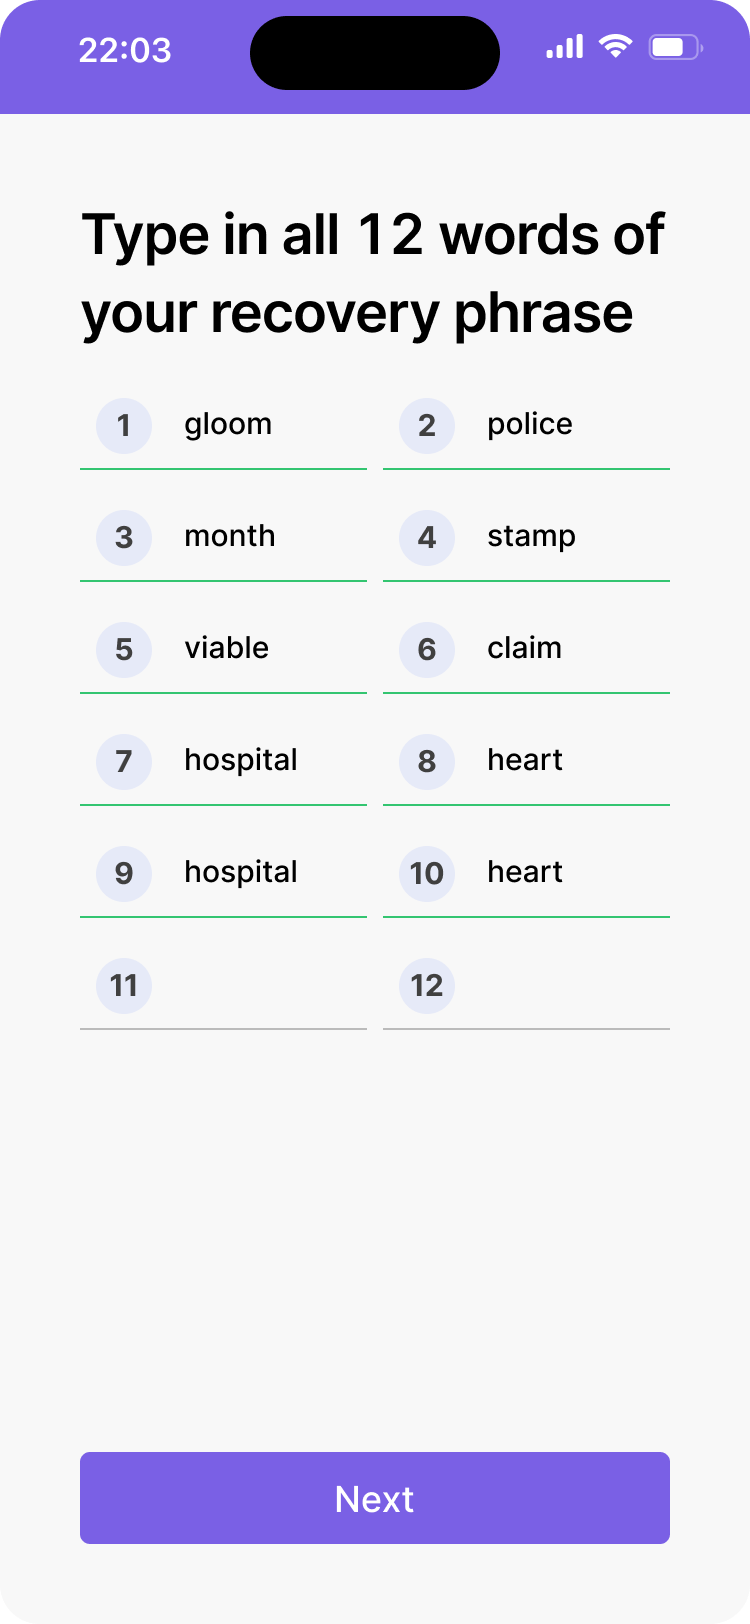
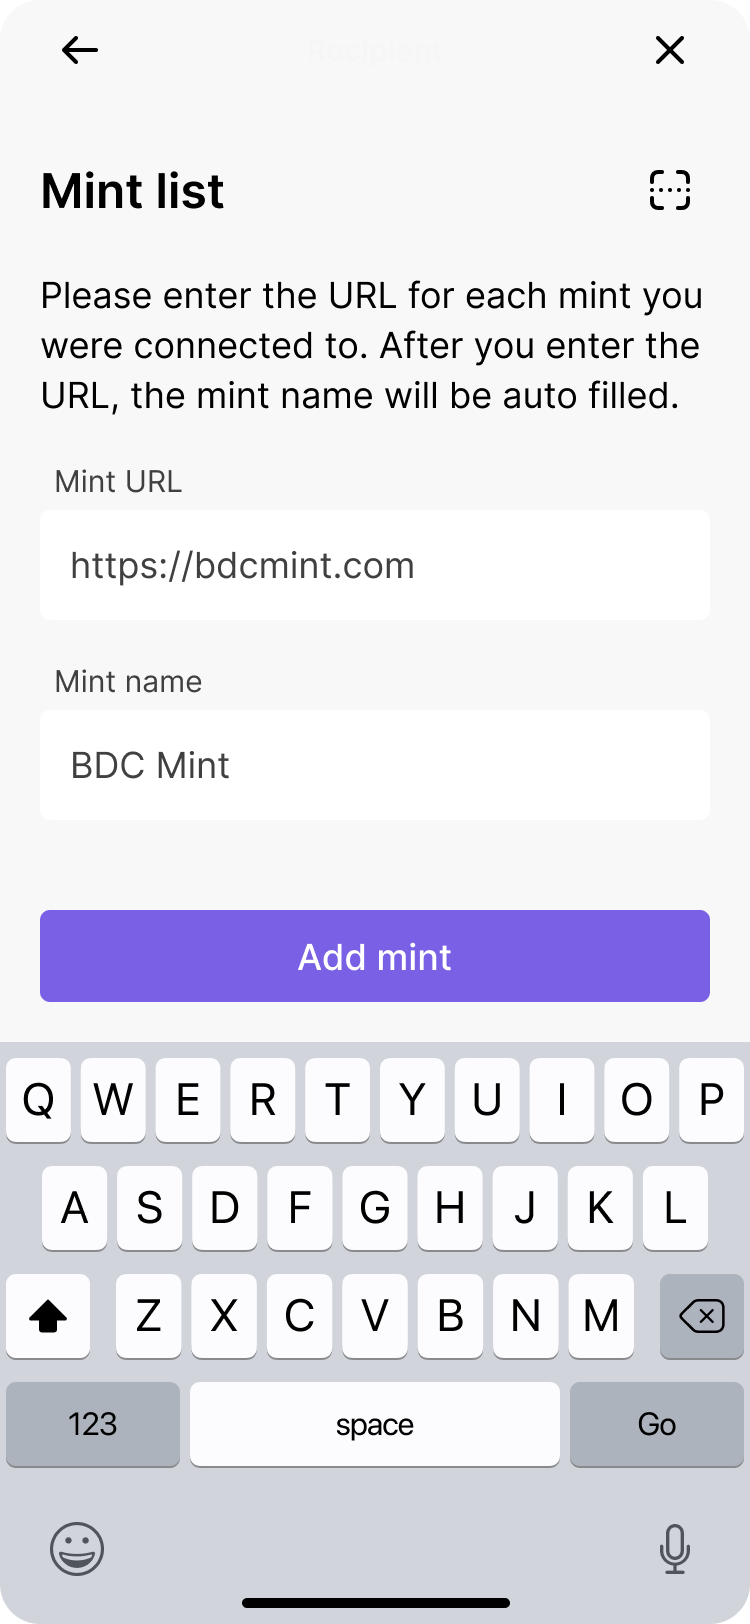
Allow user to enter the recovery phrase, include numbering.
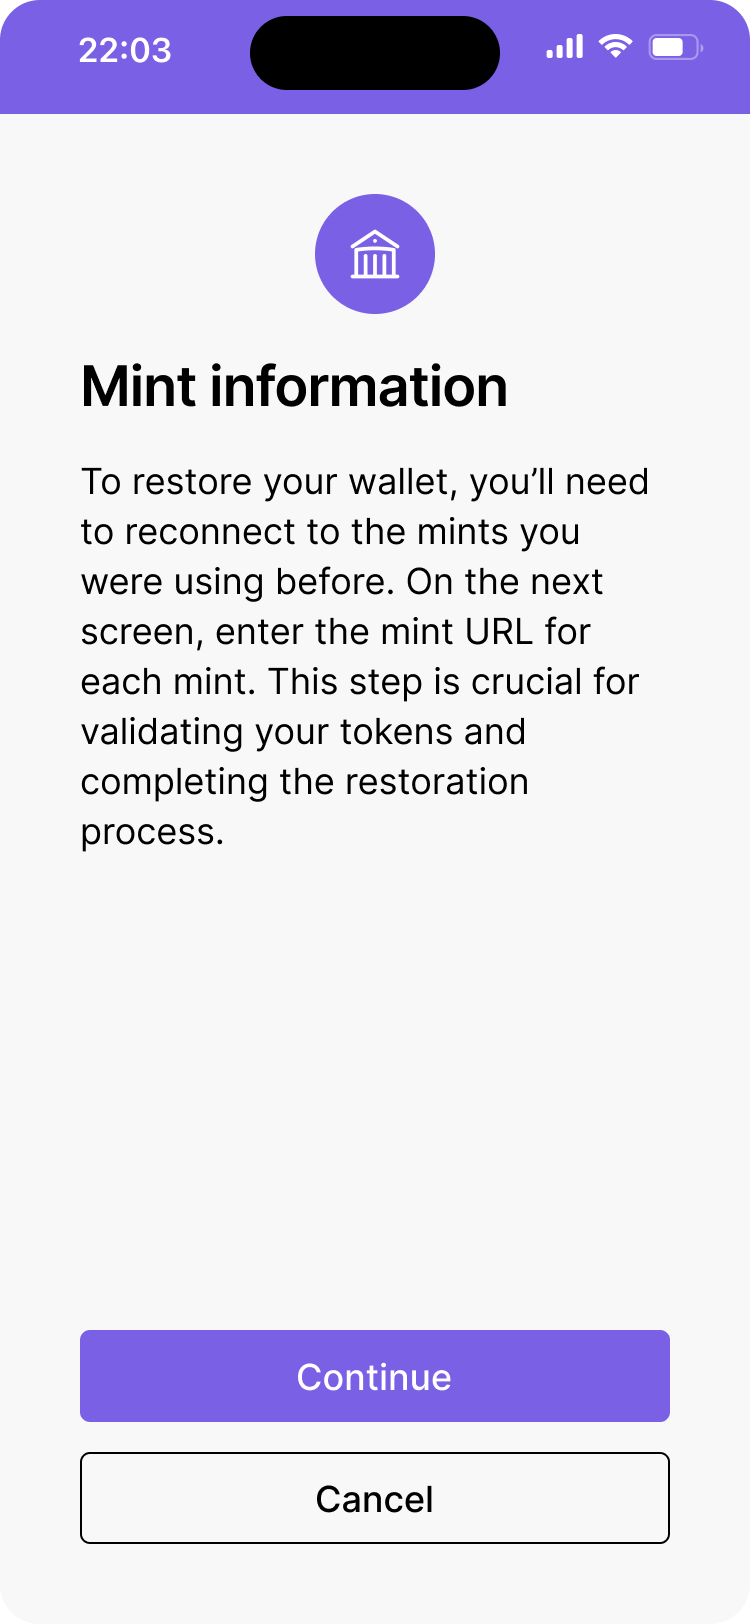
Explain what the mint information is needed before proceeding, and give user the option to back out.
Requiring the user to enter the mint url prevents any errors. All other mint information (metadata) can be retrieved from the mint url.
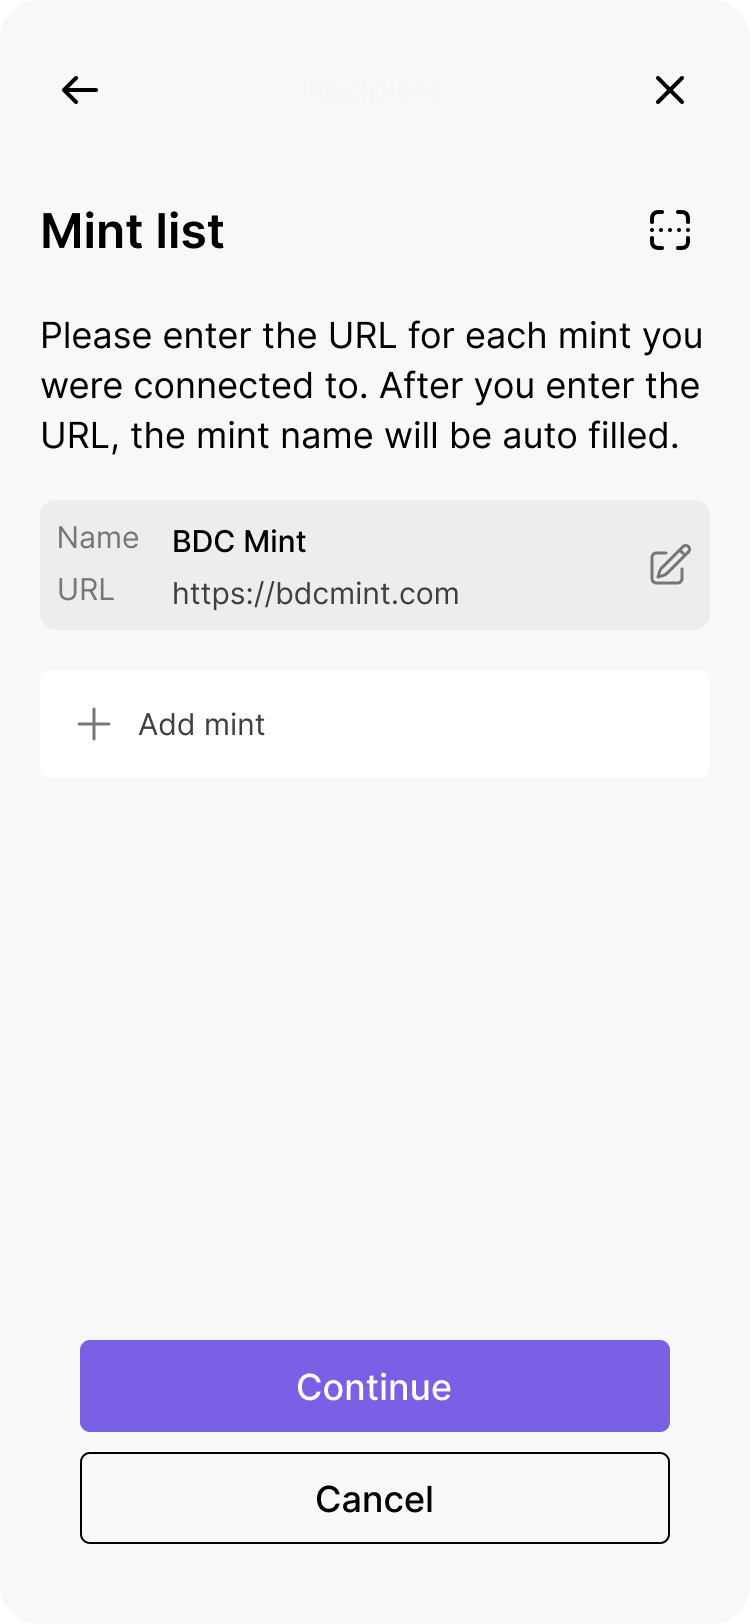
Provide user with the option to type mint information or scan a mint’s QR code.
When restoring a wallet, users must first enter their seed phrase, which regenerates the secrets previously used to mint ecash. Currently, all Cashu wallets require users to manually input the mint URL for each mint they were previously connected to. The mint then verifies these blinded messages against its records to confirm if they’ve been seen before and can reissue the signature if valid.
In the future, applications may implement encrypted, privacy-preserving backup servers that maintain a list of federations or mints the user has joined, simplifying the restoration process.
Cashu design guidelines
Cashu payment request
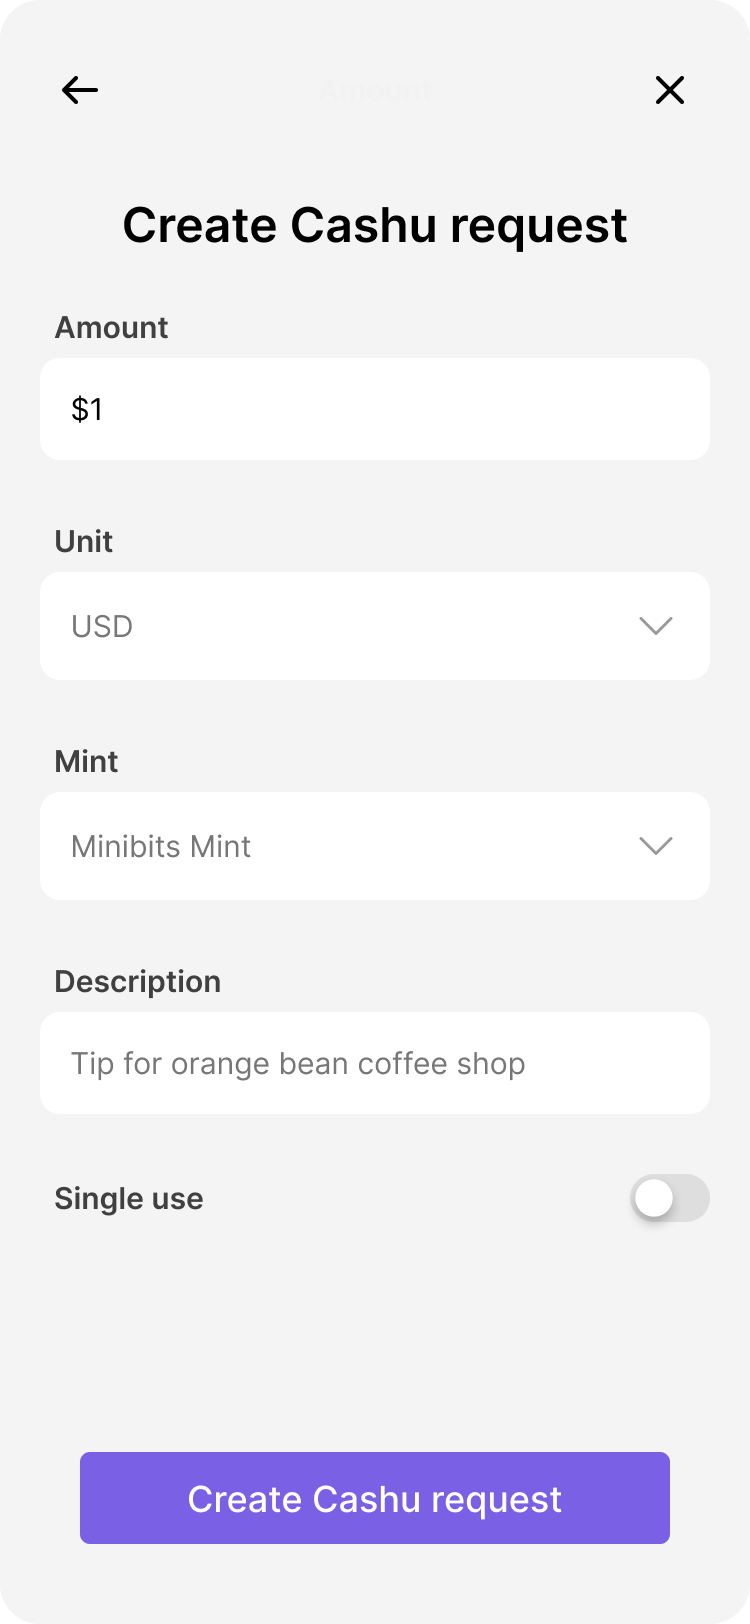
Process of creating a Cashu payment request. Receiver specifies an amount of $1 in USD-based ecash, specifying the mint along with a description to be shown to the payer.
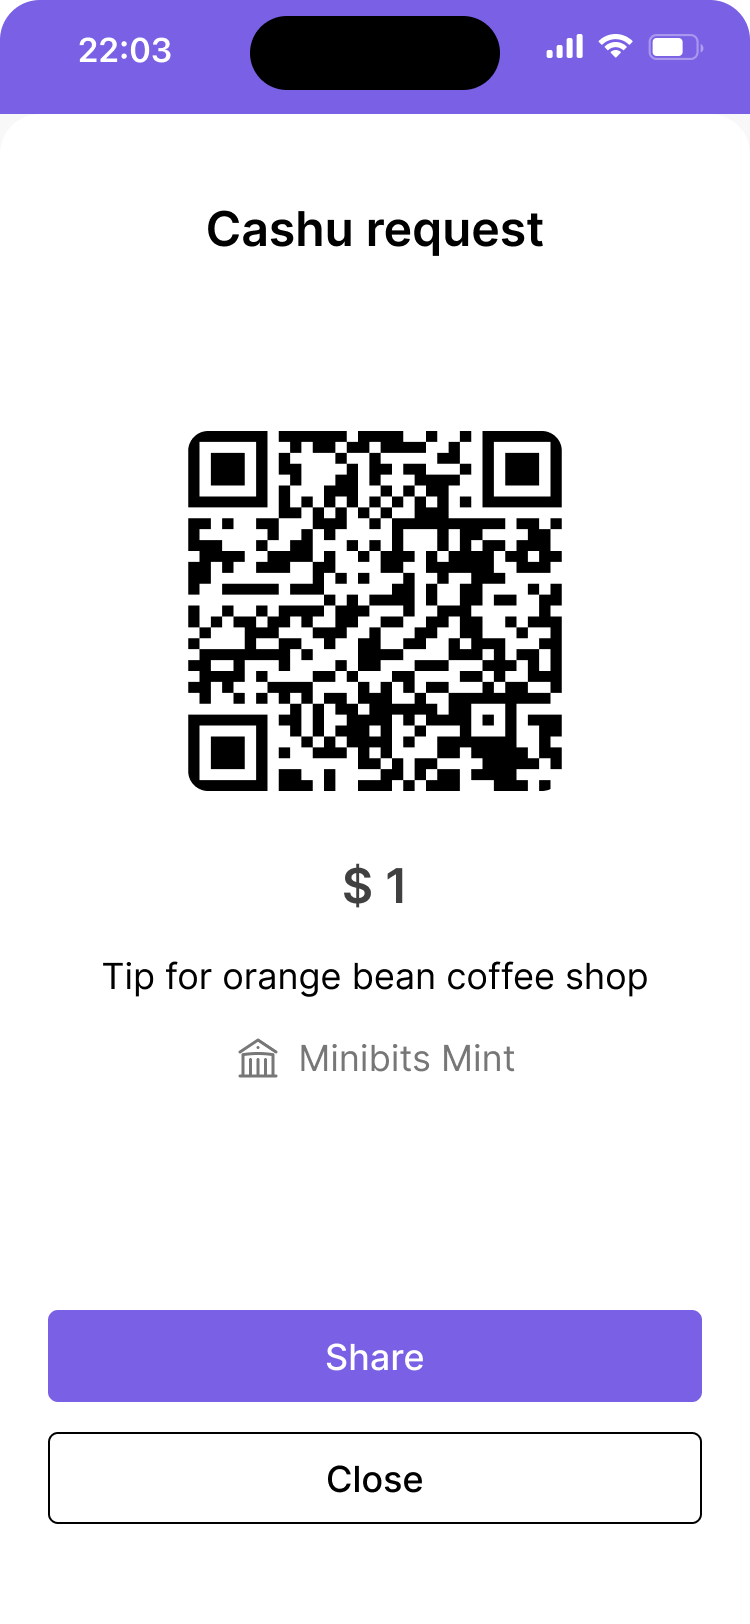
Completed Cashu payment request generated by the receiver.
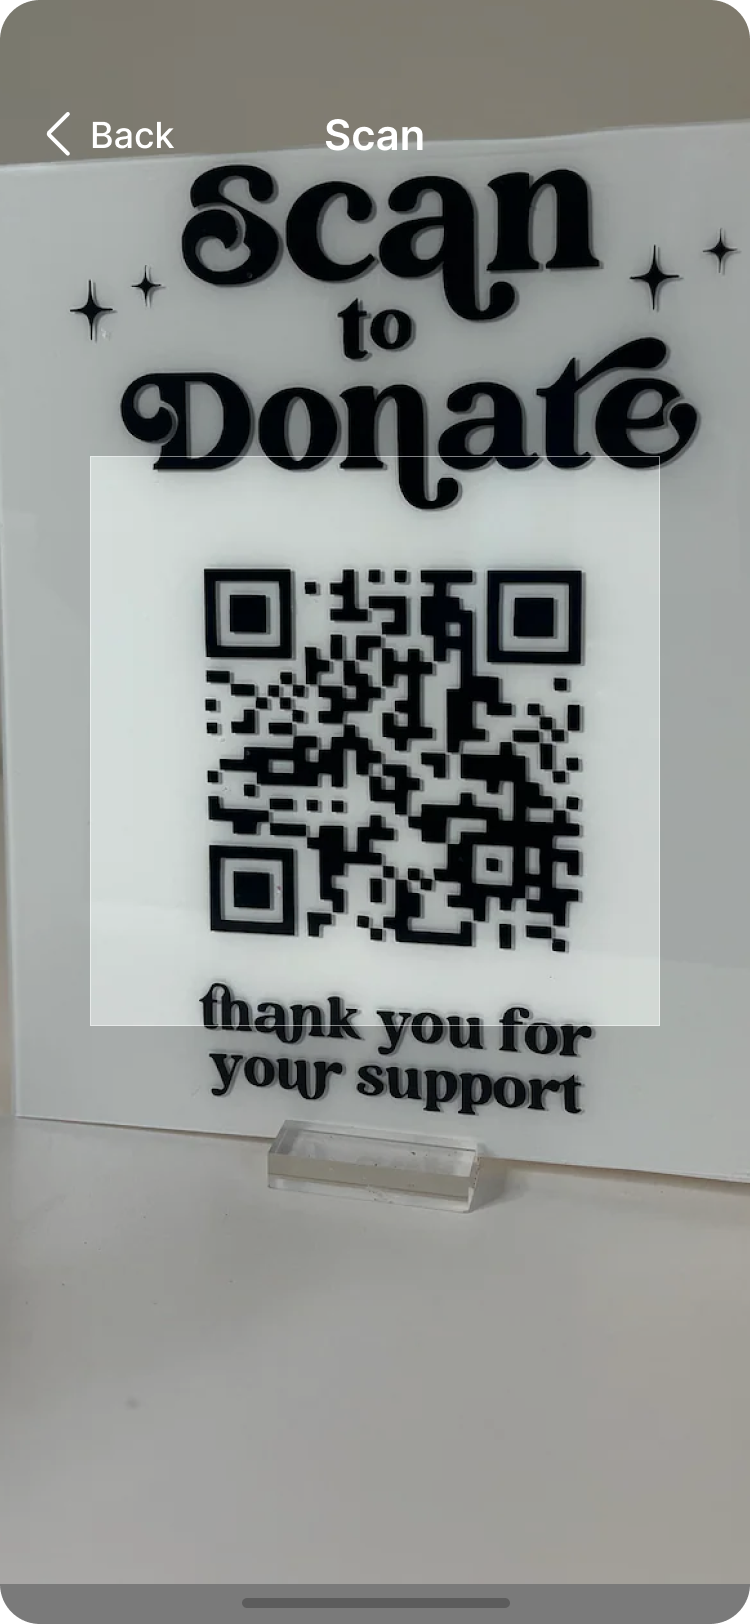
The payer scans a Cashu request QR code.
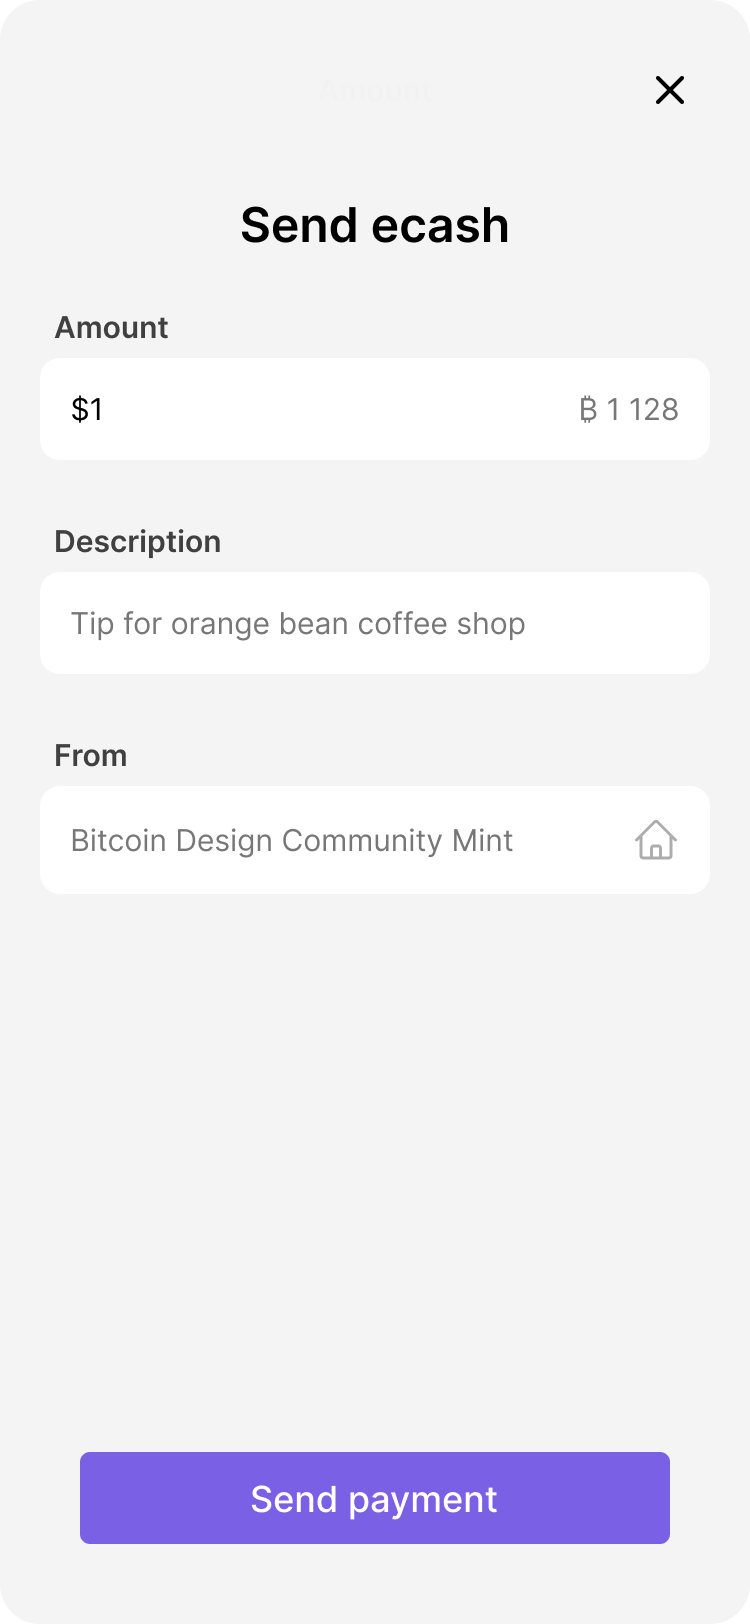
Confirmation screen appears after the payer scans the QR code, showing all payment details before finalizing the transaction.
NUT-18 introduces a standardized format for cashu payment requests, allowing receivers to initiate transactions with clear, structured information that the sender can easily pay.
A Cashu Request includes fields that specify the amount, unit, and whether the request is for single-use, as well as a description that provides context to the sender. The request can also define which mints are preferred for payment, and offer a choice of transport methods (https or nostr) for completing the transaction.
For receivers, Cashu requests ensure that they can easily input payment details and generate a QR code or other format for display.
For senders, their wallet should display the request details in a user-friendly way upon scanning, showing the amount, description, and any relevant mint preferences before they confirm payment.
Edit mint URL & refresh mint settings
Give the user the option to edit the mint url.
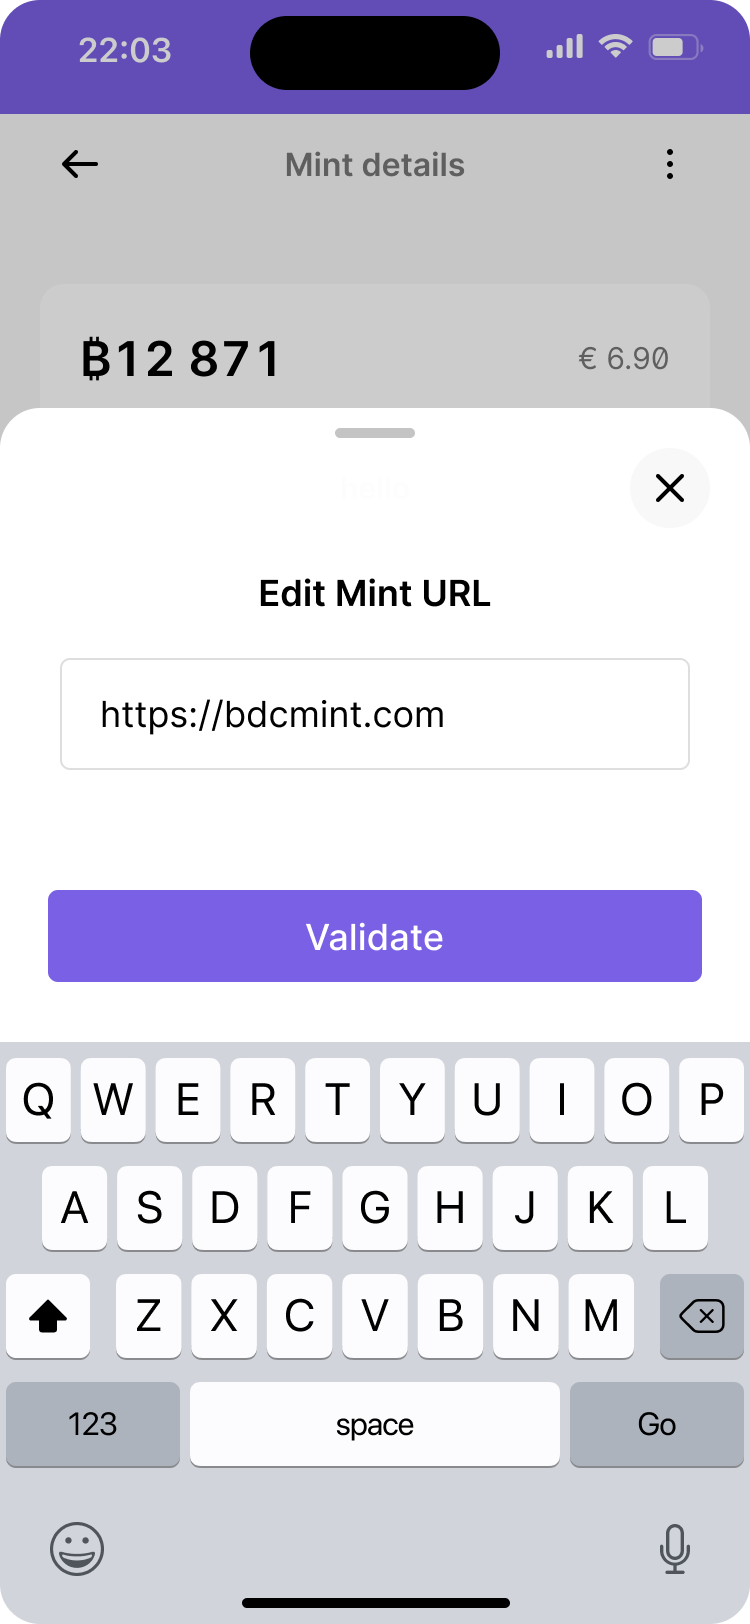
Allow the user to manually type the mint url.
It’s useful to provide users with the ability to manually update or refresh mint settings in their wallets. While best practices suggest that wallets should auto-refresh and update mint settings periodically, there may be cases where this isn’t supported, or a mint undergoes significant updates, such as a URL change. By allowing users to edit the mint URL or refresh settings manually, you ensure that users always have the latest mint configurations.
Metadata and information management
NUT-06 provides a standardized way to display metadata for Cashu mints. Incorporating these metadata fields makes your application more transparent and informative. Here’s a breakdown of each field and how it can be used in wallet design:
Mint identity and version
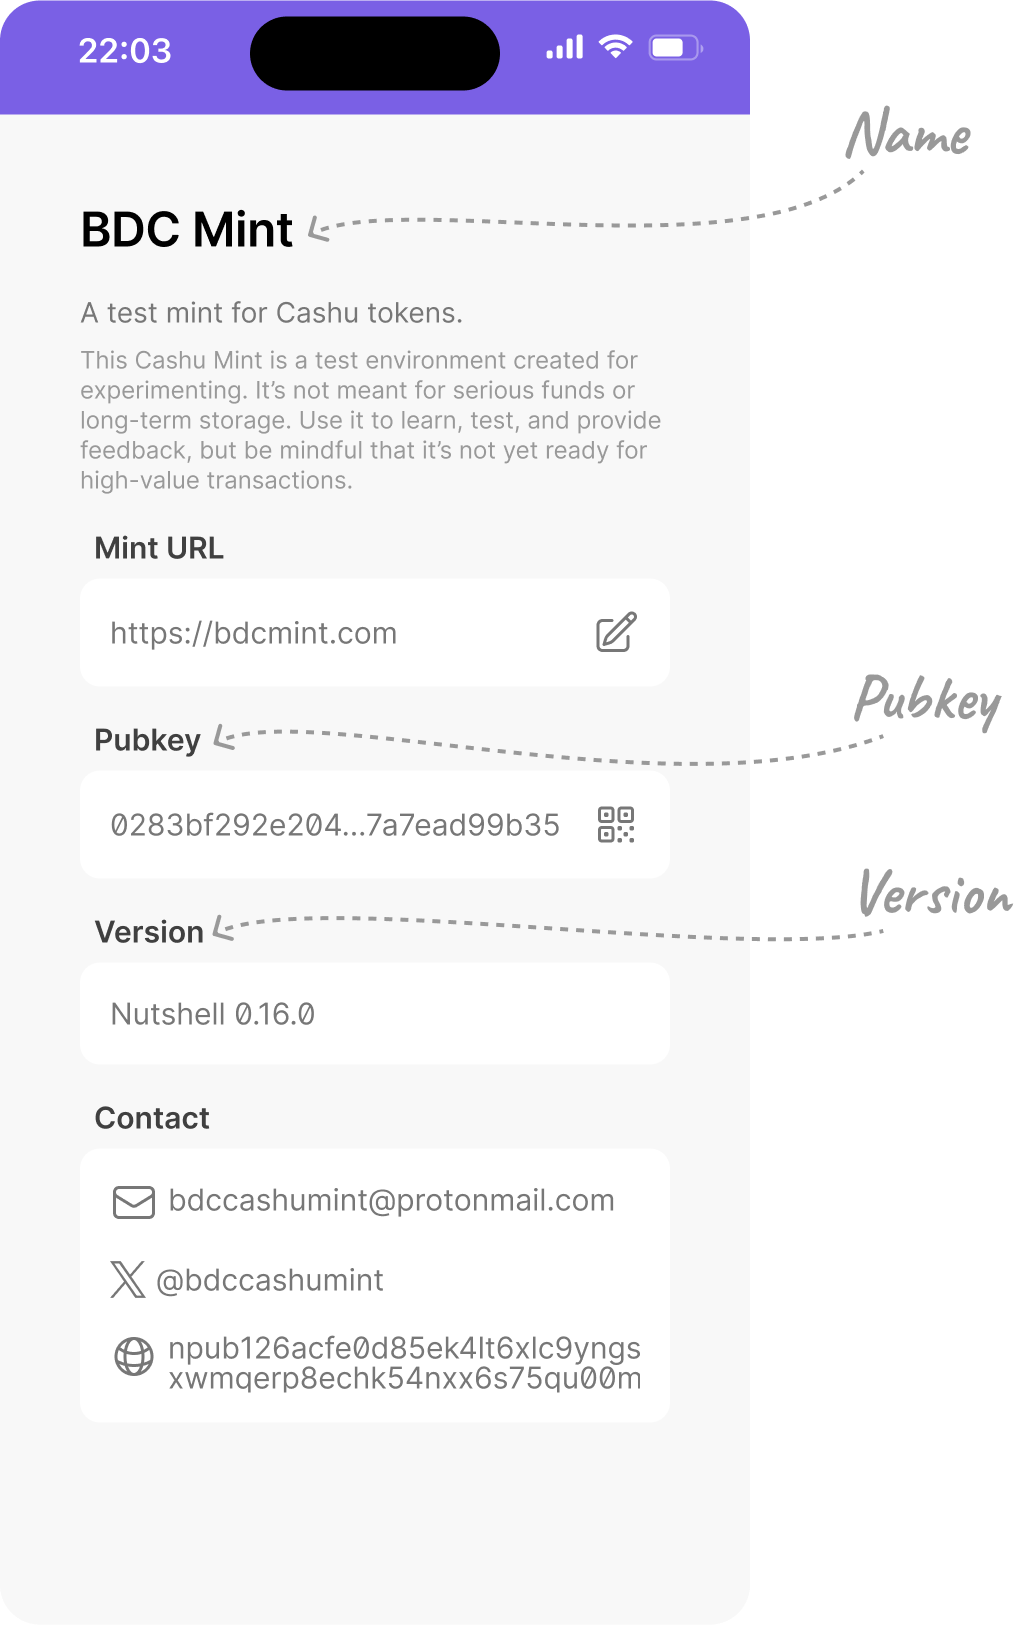
Consider the most important information to display to the user about the mint.
name: The name of the mint. Display this prominently in mint listings and details pages to help users quickly identify different mints.
version: Shows the implementation name and software version of the mint. Consider displaying this in the mint details to inform users about the mint’s current software status.
Mint descriptions
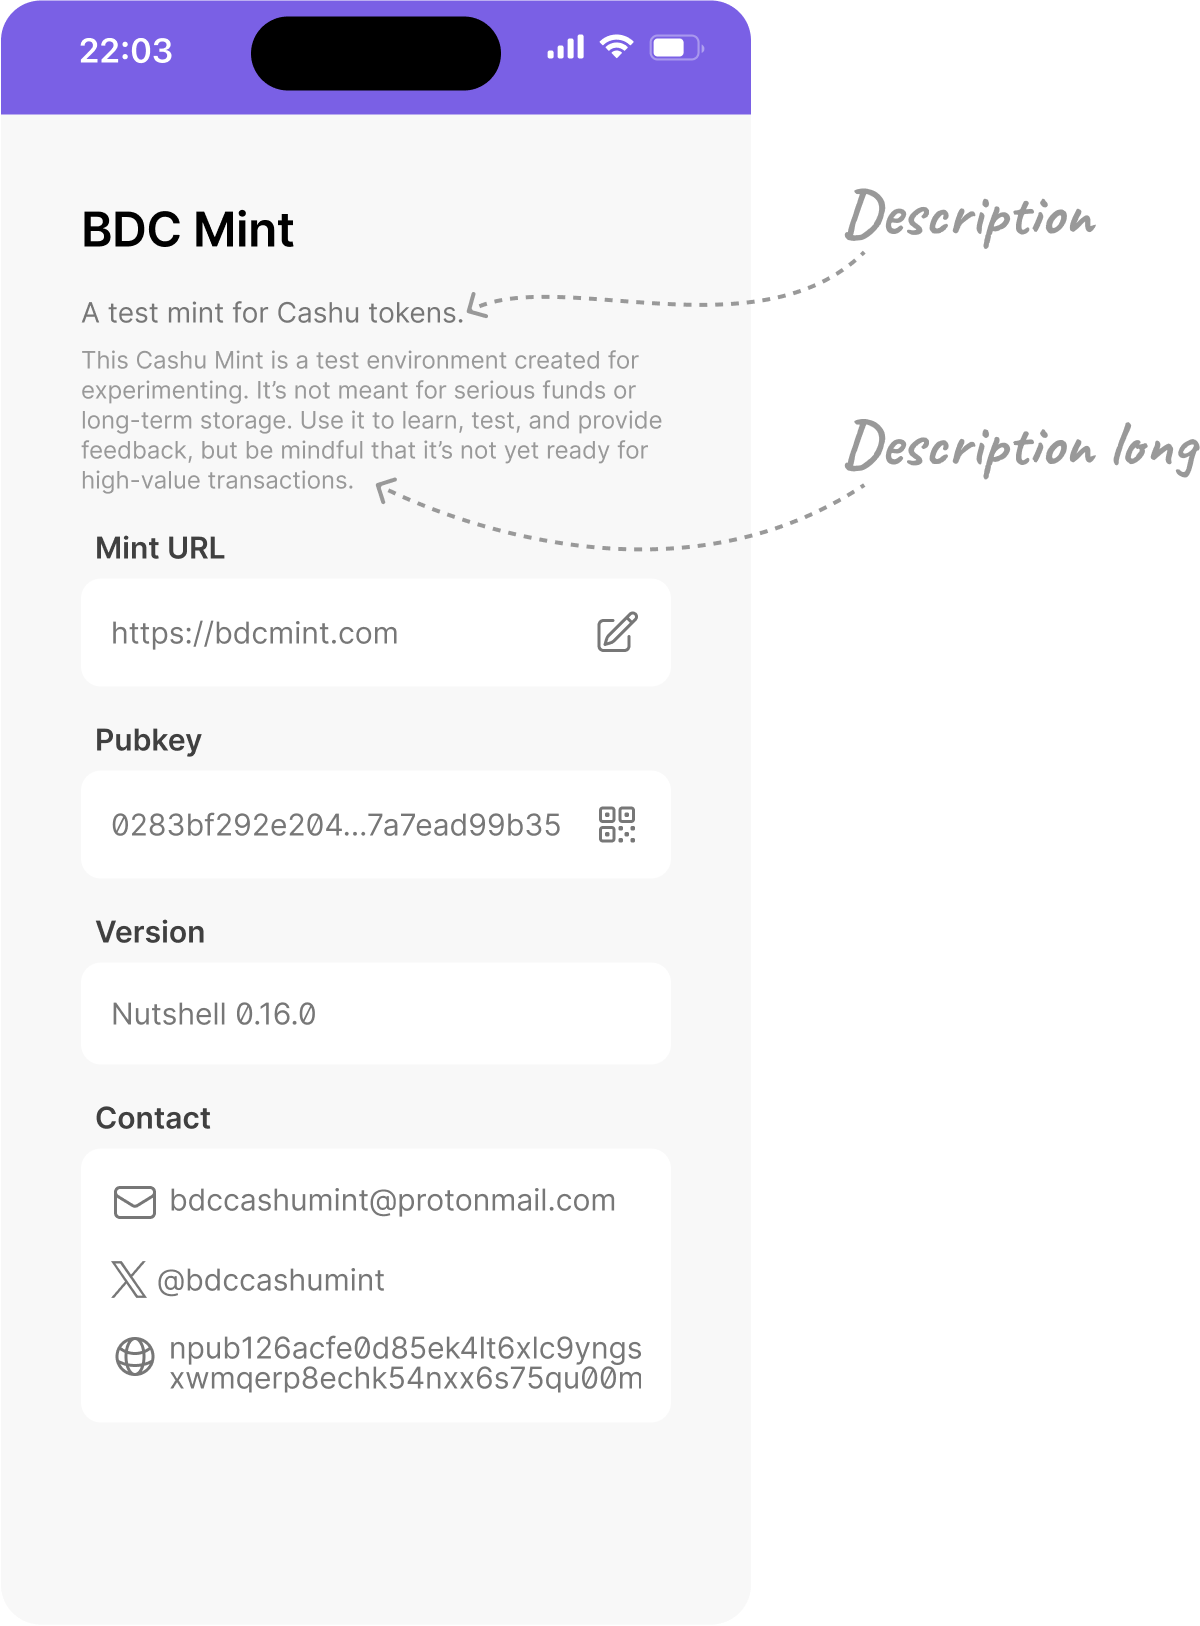
Different mint operator may use the description fields differently. Consider this when designing your mint details screen.
description: A short description of the mint. Consider displaying this in mint listings or as a subtitle under the mint name to give users a quick overview.
description_long: A more detailed description. This can be displayed on a dedicated mint information page or in an expandable section for users who want more details.
Contact information
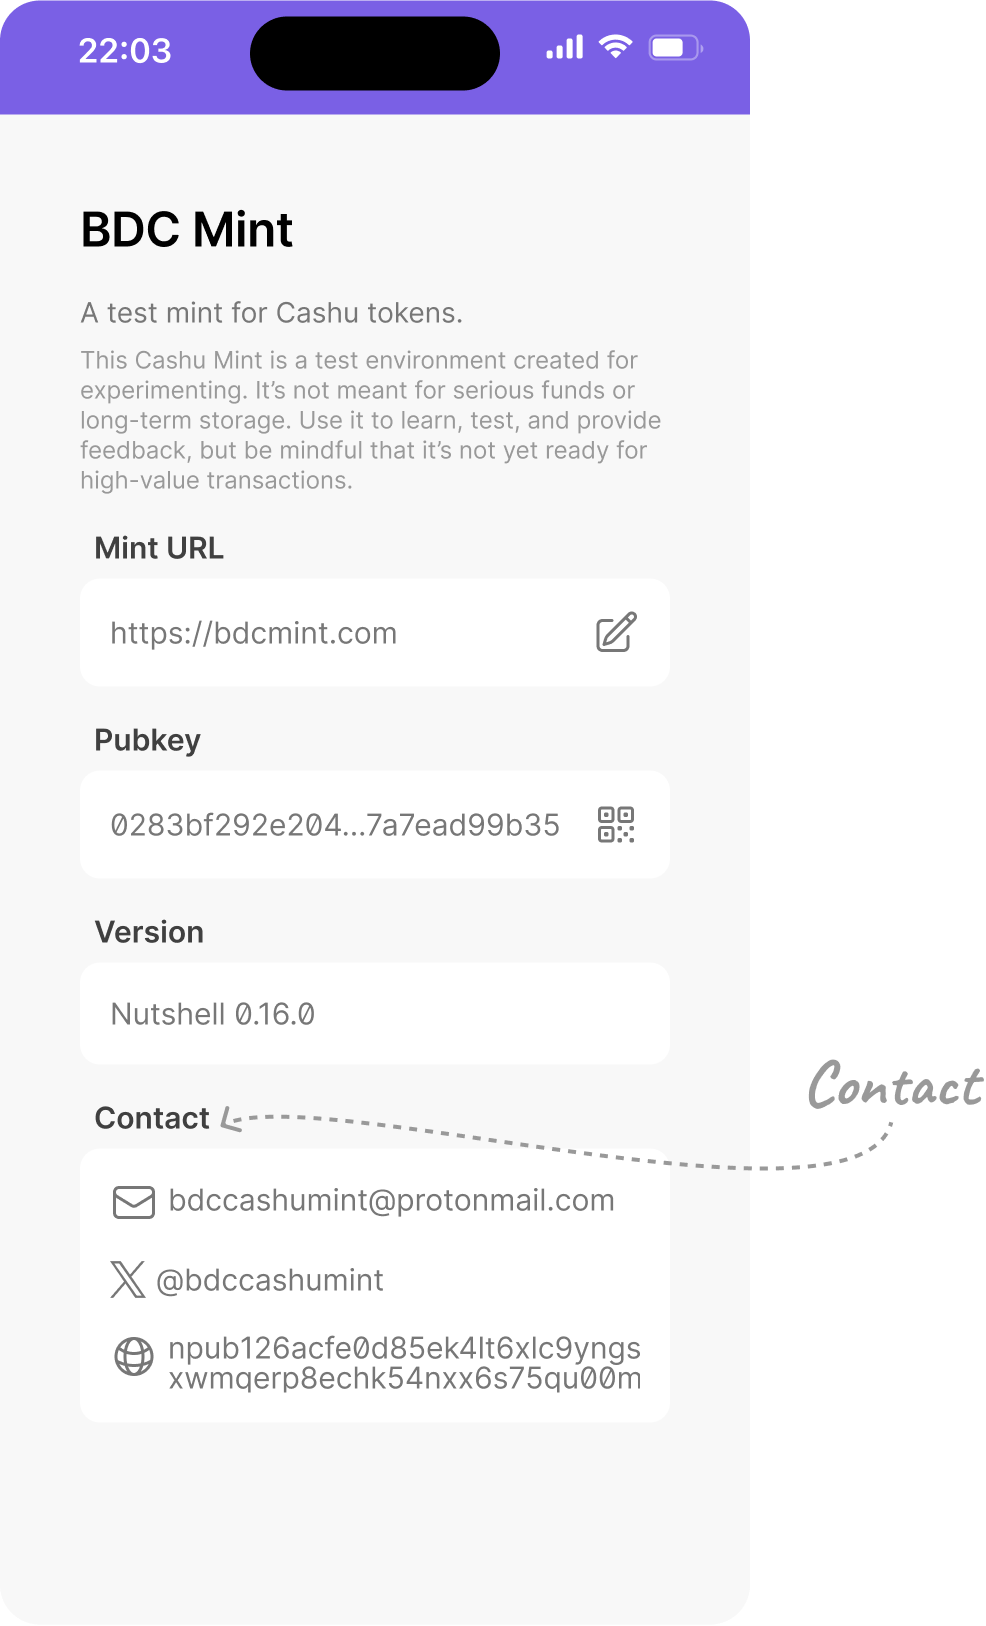
Contact information is optional for the mint operator to include. If there is no contact information, consider not displaying this metadata.
contact: An list of contact methods for the mint operator. Consider displaying this in the mint details, using appropriate icons for each contact method (e.g., nostr, email icon, website icon) to make it easy for users to reach out if needed.
Important announcements
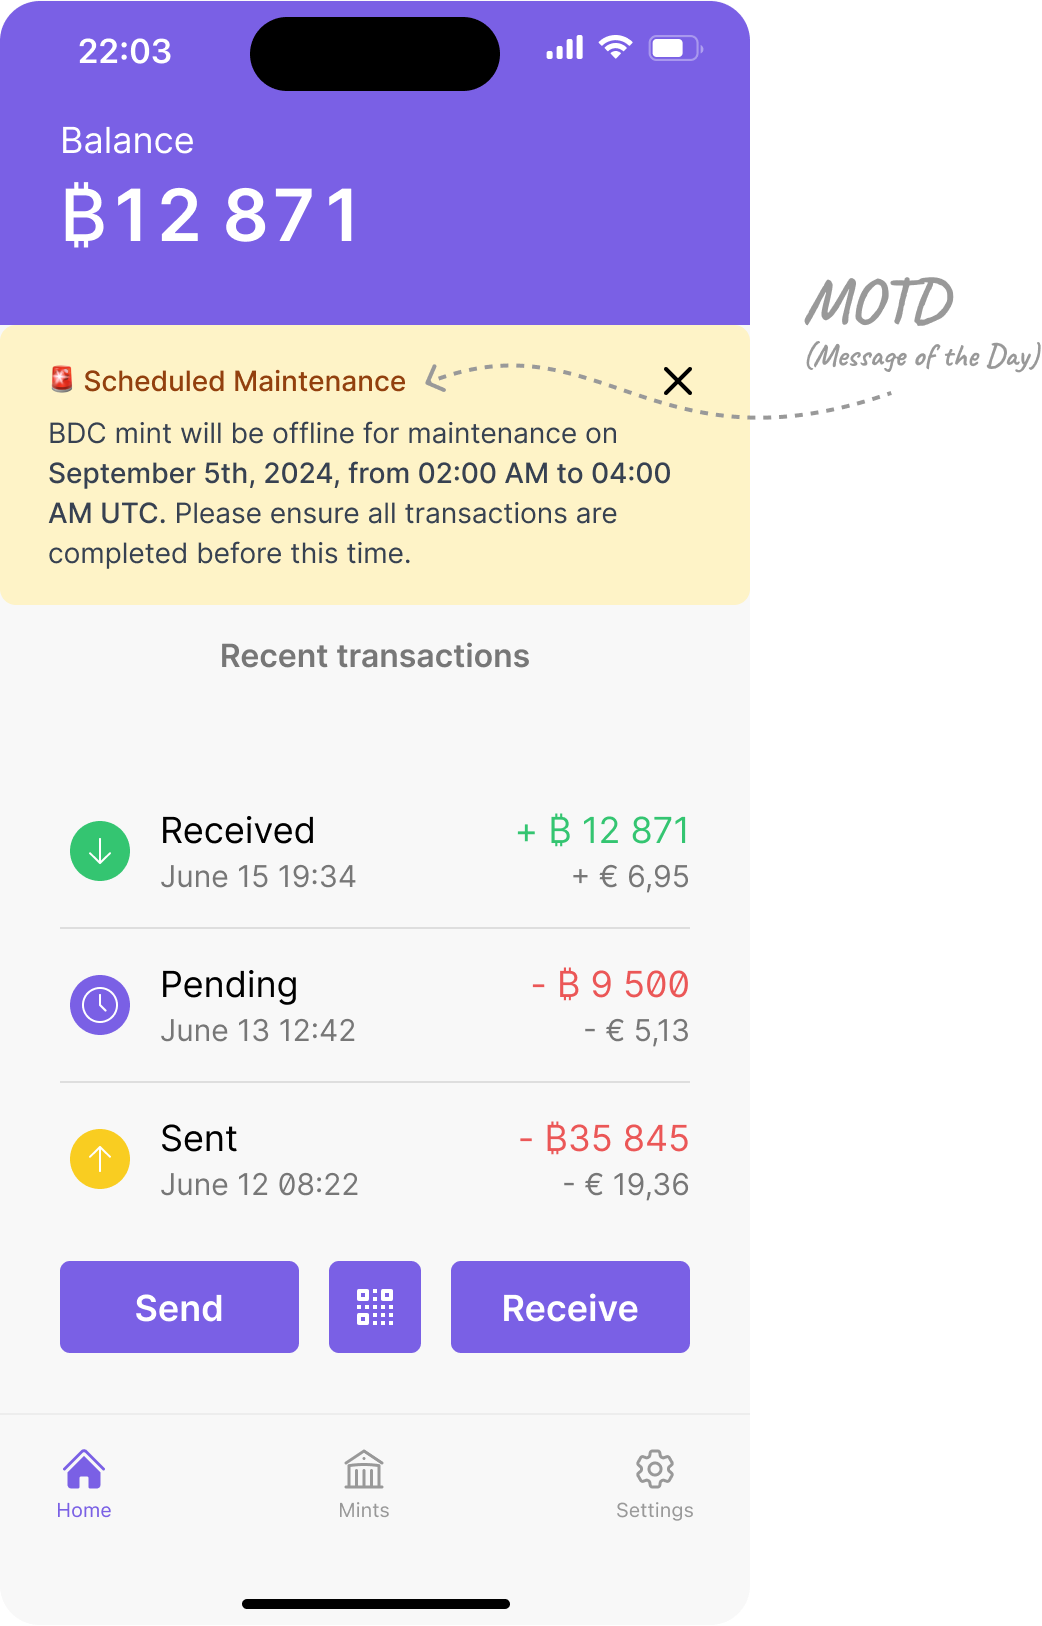
A message of the day can consists of anything the mint operator wants to tell the user. It can for example be used to announce a new feature or a upcoming maintenance.
motd (Message of the day): Used for important announcements. Consider displaying this in a prominent, dismissible notification area when users interact with the mint, making sure they don’t miss any critical information.
Supported features

Supported features are pulled by indexing a mints information and reading what nuts the mint has implemented.
nuts: Indicates which NUT specifications the mint supports and their settings. Create a “Features” or “Capabilities” section in the mint details, translating technical NUT numbers into user-friendly feature descriptions.
Avoid jargon & NUTs 01-06
When displaying NUTs (Notation, Usage, and Terminology) that a mint supports, avoid simply listing NUT01, NUT02, etc. Instead, provide users with clear descriptions of each NUTs functionality. This helps users understand the features and capabilities of the mint at a glance. Since NUTs 01-06 are mandatory for Cashu protocol interoperability, focus on optional NUTs that add unique functionality. Consider using the descriptions provided in the official documentation to keep the information accurate.
Organizing Cashu metadata fields
When designing your Cashu wallet, consider organizing these metadata fields in a logical, user-friendly manner to help users understand and interact with different mints. Here are some suggestions:
- Use the
nameand shortdescriptionin mint listings for quick identification of mints. - Display a detailed mint information page using
description_long,version, andcontactdetails. - Display the
motdas a prominent notification when relevant to the specific mint. - Use the
nutsinformation to create a features list that helps users understand each mint’s capabilities.
By effectively incorporating these Cashu metadata fields, you can create a more transparent and informative experience for users, helping them make informed decisions about which Cashu mints to trust and use. This is particularly important for Cashu, as users interact directly with individual mints rather than a federation structure like in Fedimint.
Pay to public key (P2PK)
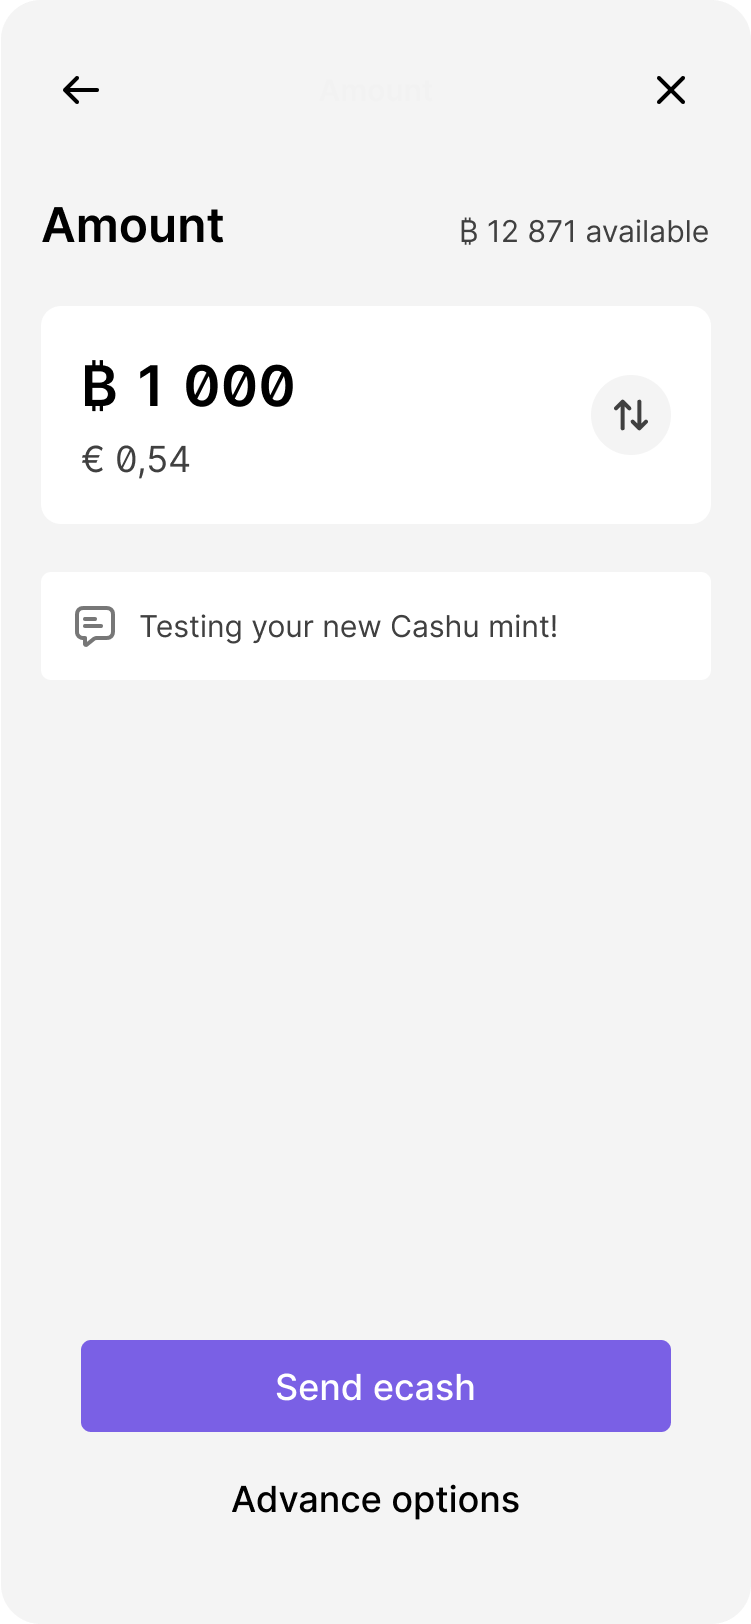
P2PK is an advance feature and should not be displayed as a regular feature.
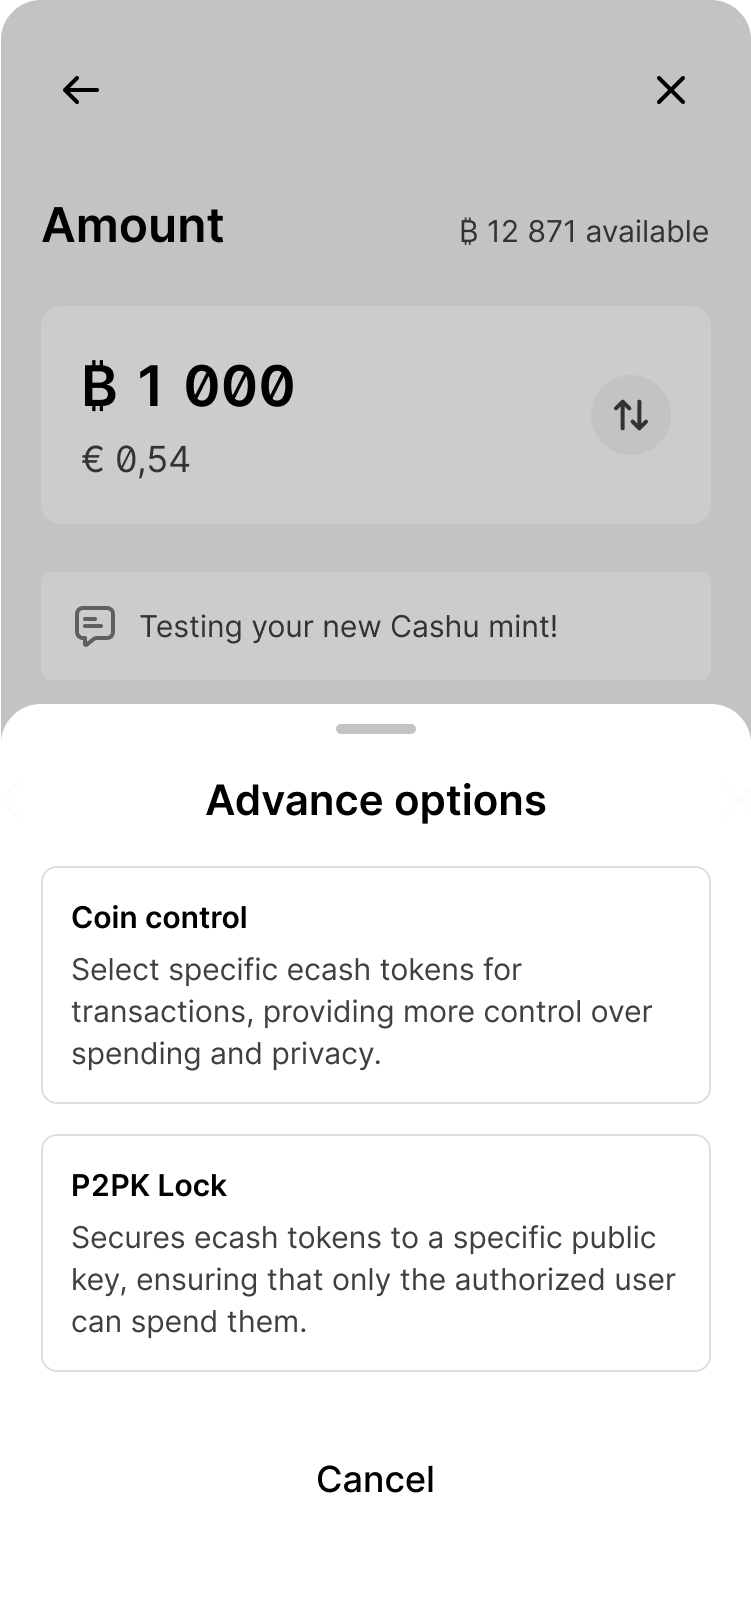
Consider showing advance features like P2PK in a bottom sheet or modal.
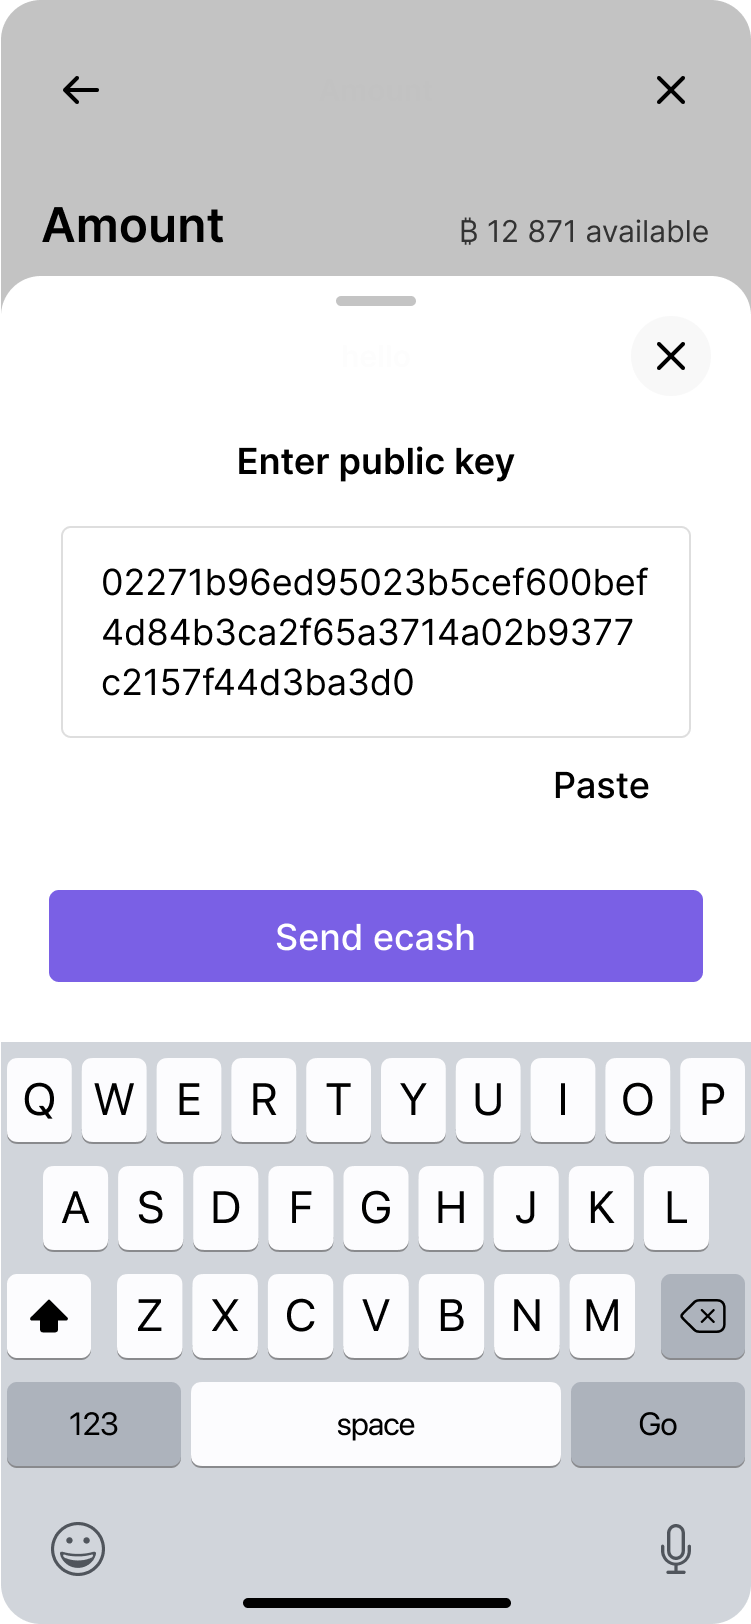
Allow the user to manually enter the recipient’s public key or
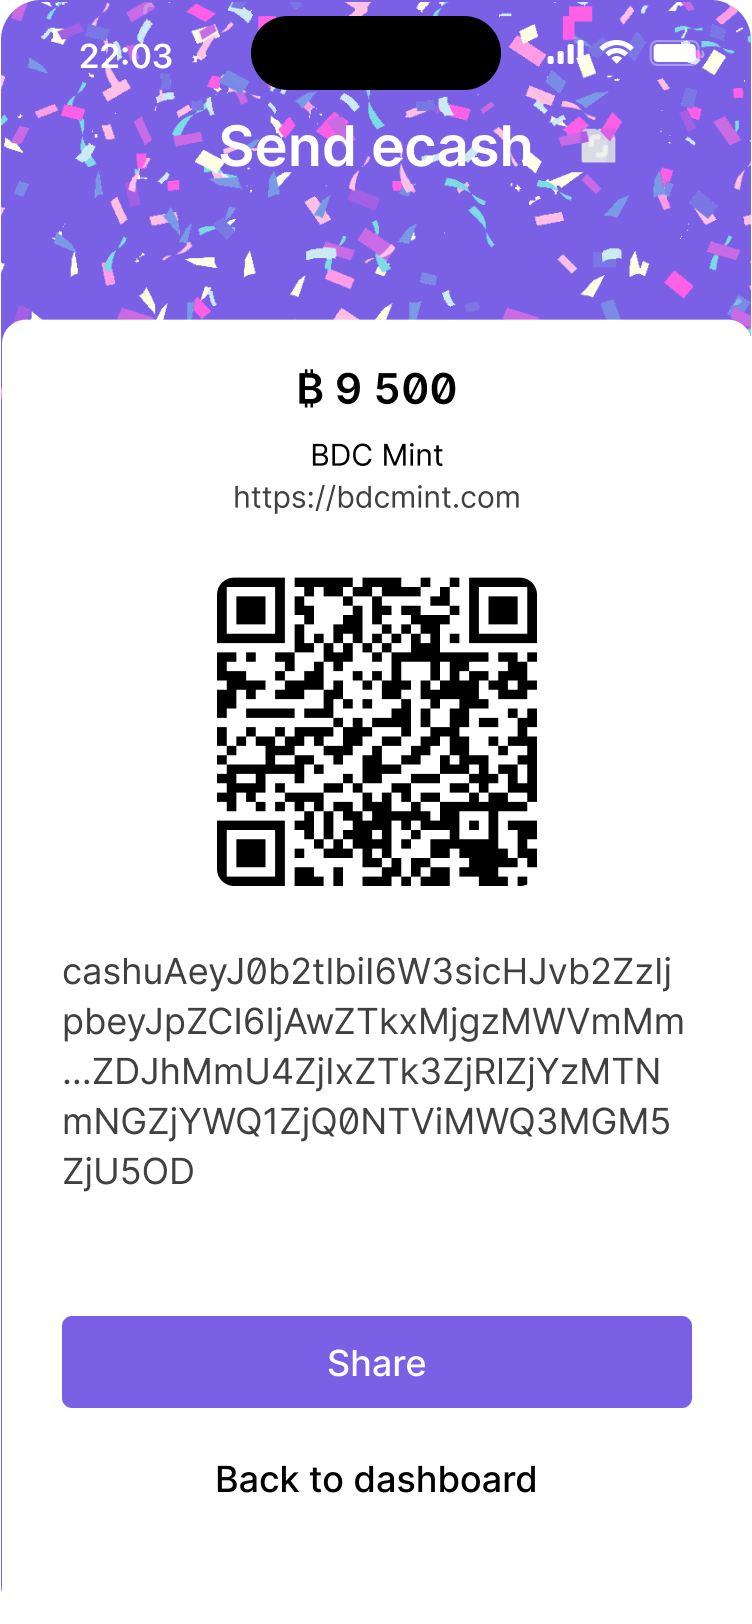
Allow the user to copy the token string to clipboard by tapping on QR code or text string.
NUT-11 is a powerful feature that allows bitcoin-backed ecash tokens to be securely locked to another user’s public key, which is generated by the recipient’s wallet. This ensures that only the intended recipient can redeem the ecash. NUT11 enables secure offline payments, preventing double-spending. Beyond these basics, NUT11 supports advanced use cases like timelocks and multisignature (multisig) setups, where ecash can be conditionally spent or jointly owned by multiple parties. When designing make sure these functionalities are clearly communicated to users, highlighting their practical benefits and flexibility.
P2PK ecash backup limitations
P2PK ecash tokens are not derived from a seed phrase. This means they cannot be backed up using a seed phrase, and in the event of a recovery from seed phrase the P2PK ecash tokens will be lost.
Fedimint design guidelines
Federation status display
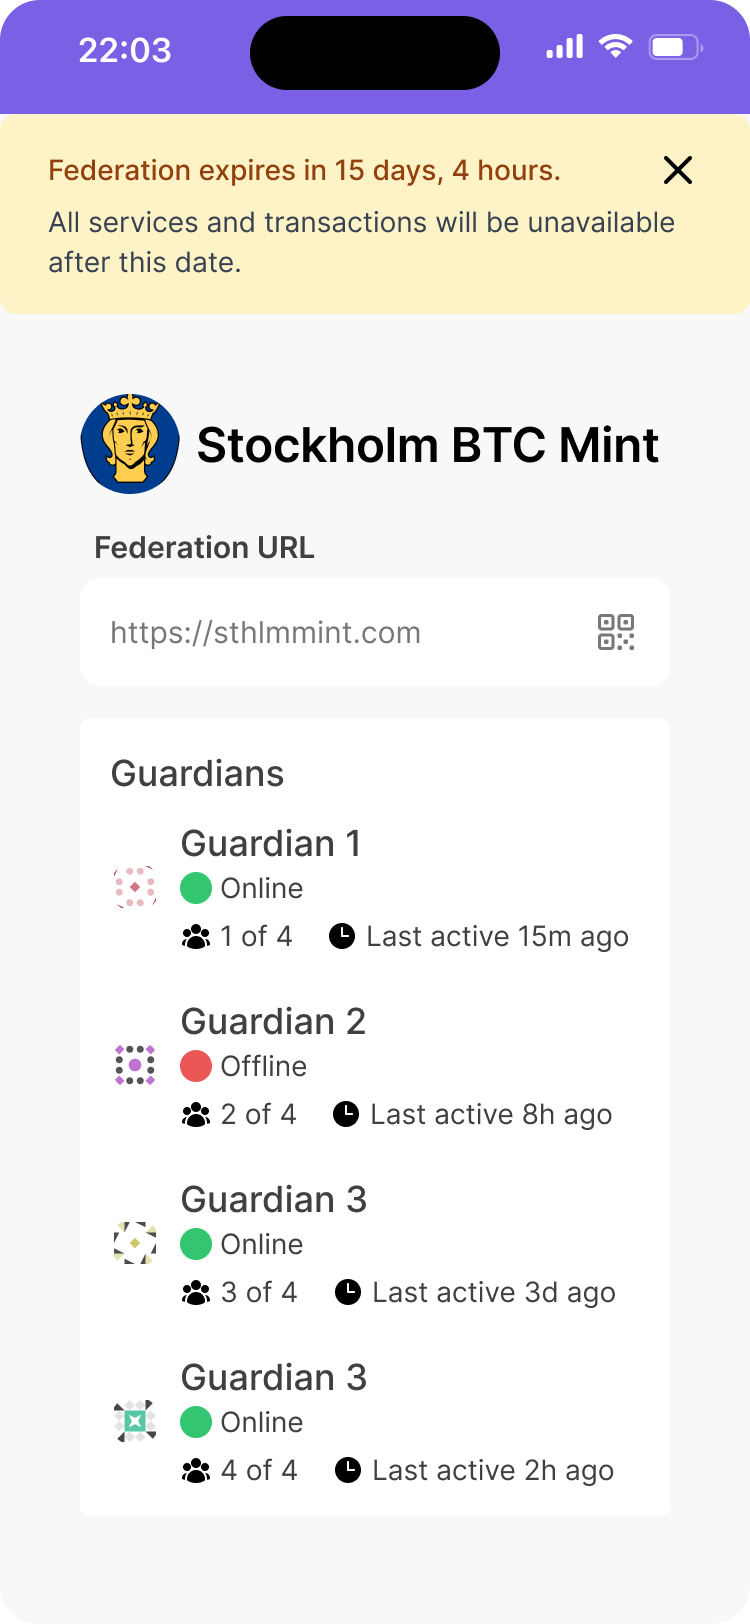
Example of a guardian status display in a wallet interface.
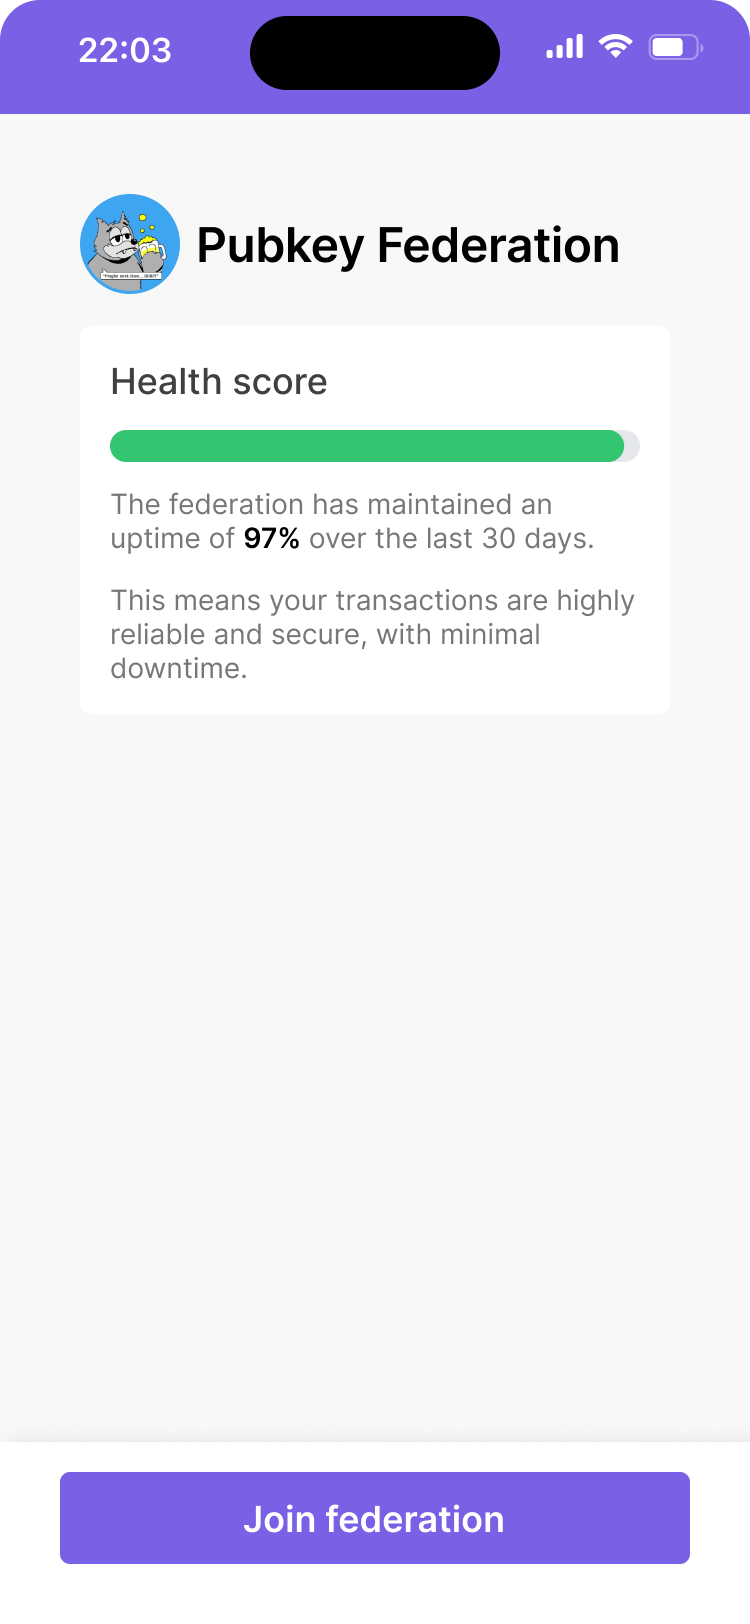
Consider using a prominent, color-coded indicator to show the overall status of the federation. This should reflect whether the federation is fully operational, partially degraded, or offline. This helps users quickly assess the health of a federation.
Guardian status indicators
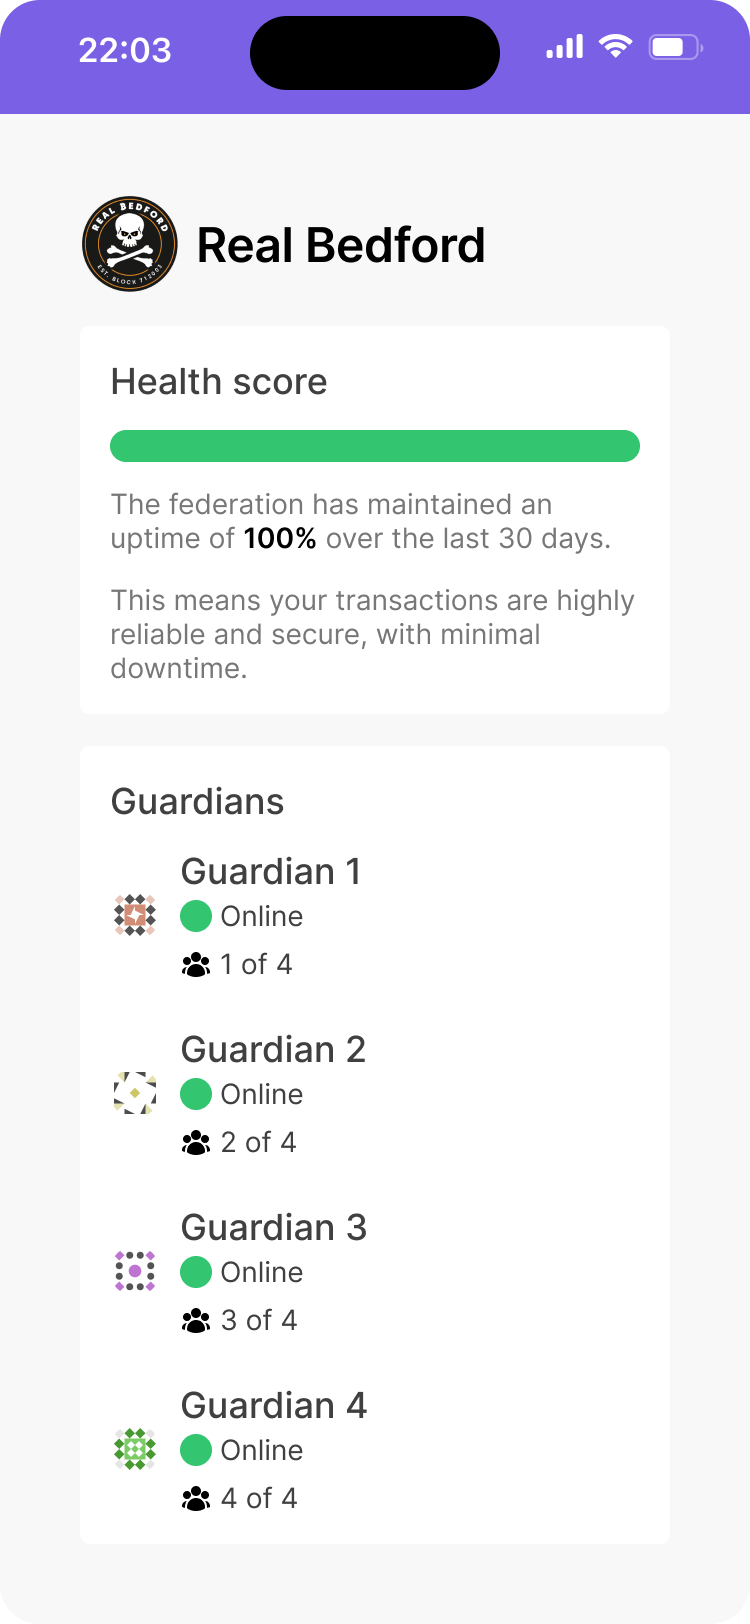
A 100% uptime score reassures users of consistent performance. Online status of all guardians confirms active oversight of funds.
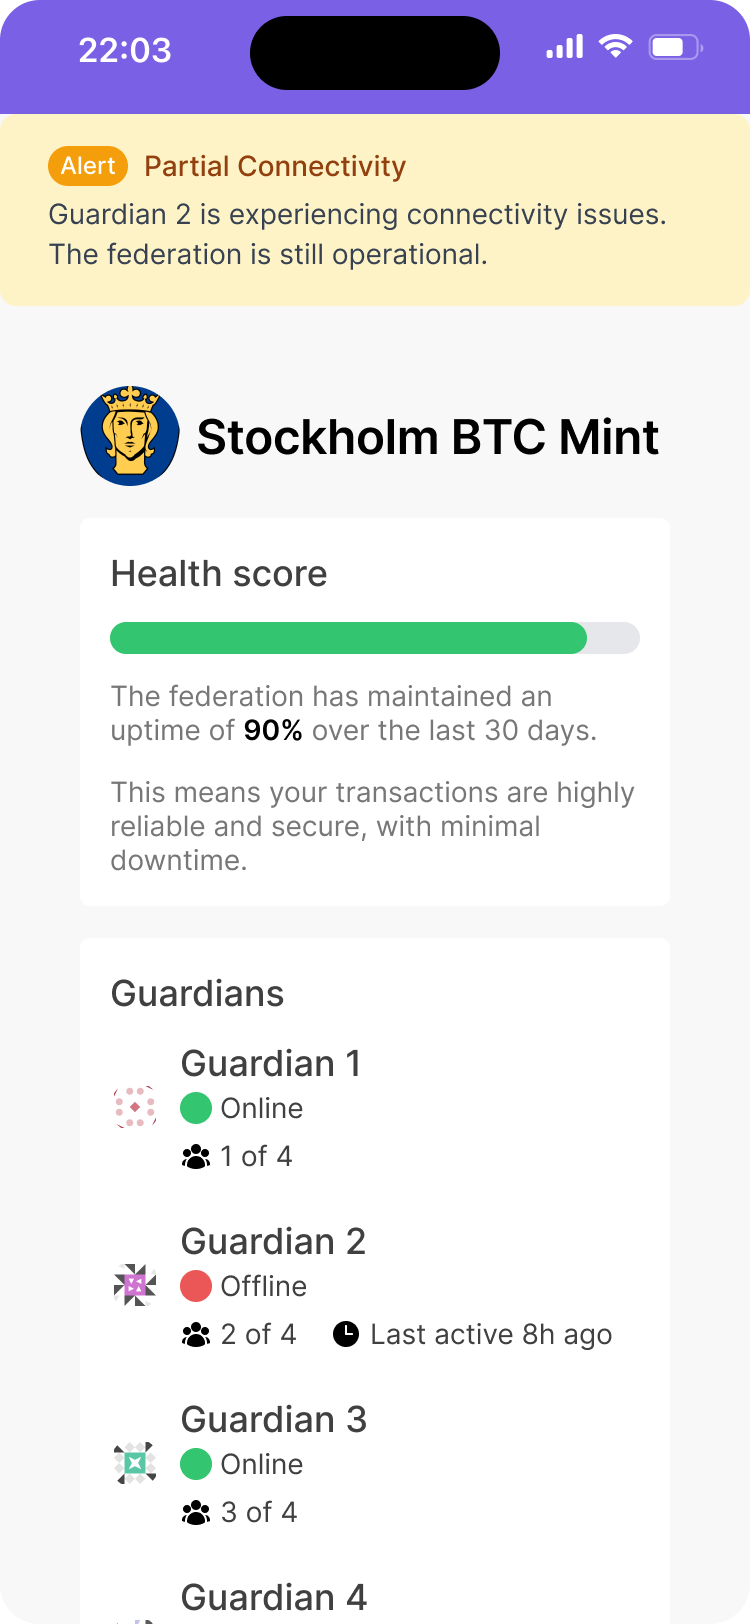
Stockholm BTC Mint status screen with a partial connectivity alert. Guardian 2 is offline, but the federation remains operational.
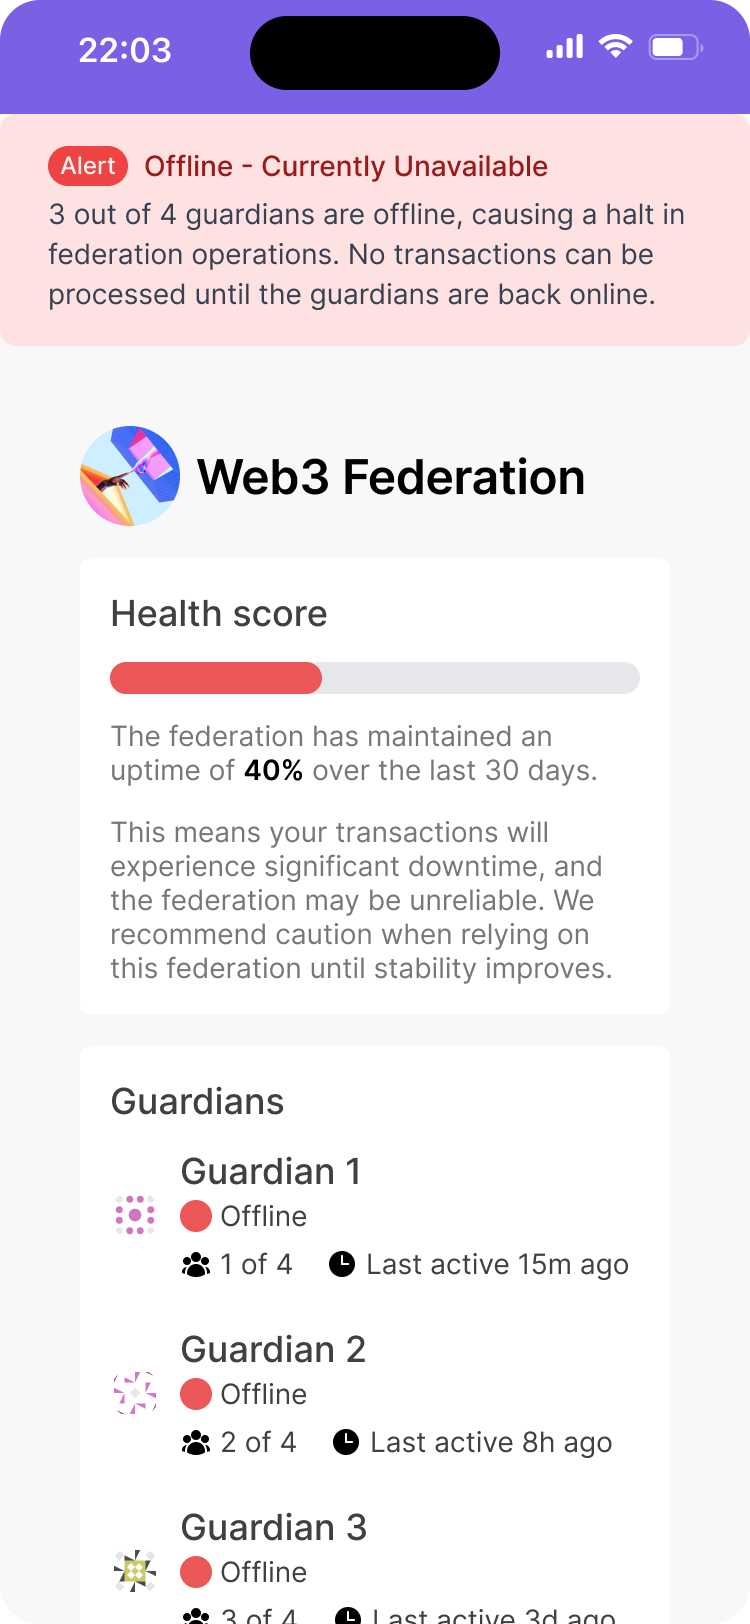
Web3 Federation status screen indicating offline status due to multiple guardians being offline.
Consider displaying real-time indicators of each guardian’s status, such as the connection status and last activity. This information builds trust by keeping users informed about the reliability and performance of the guardians managing their funds.
Metadata and information management
Federation metadata fields: explanation and usage
Federations can provide configuration and metadata to users. These metadata fields are consensus-relevant, meaning they must be consistent across all federation members. This ensures that users can rely on their accuracy. Let’s explore the core metadata fields defined in the Fedimint protocol:
Federation overview and expiration
Federation expiration timestamp displayed as a countdown alert when less 30 days remaining.
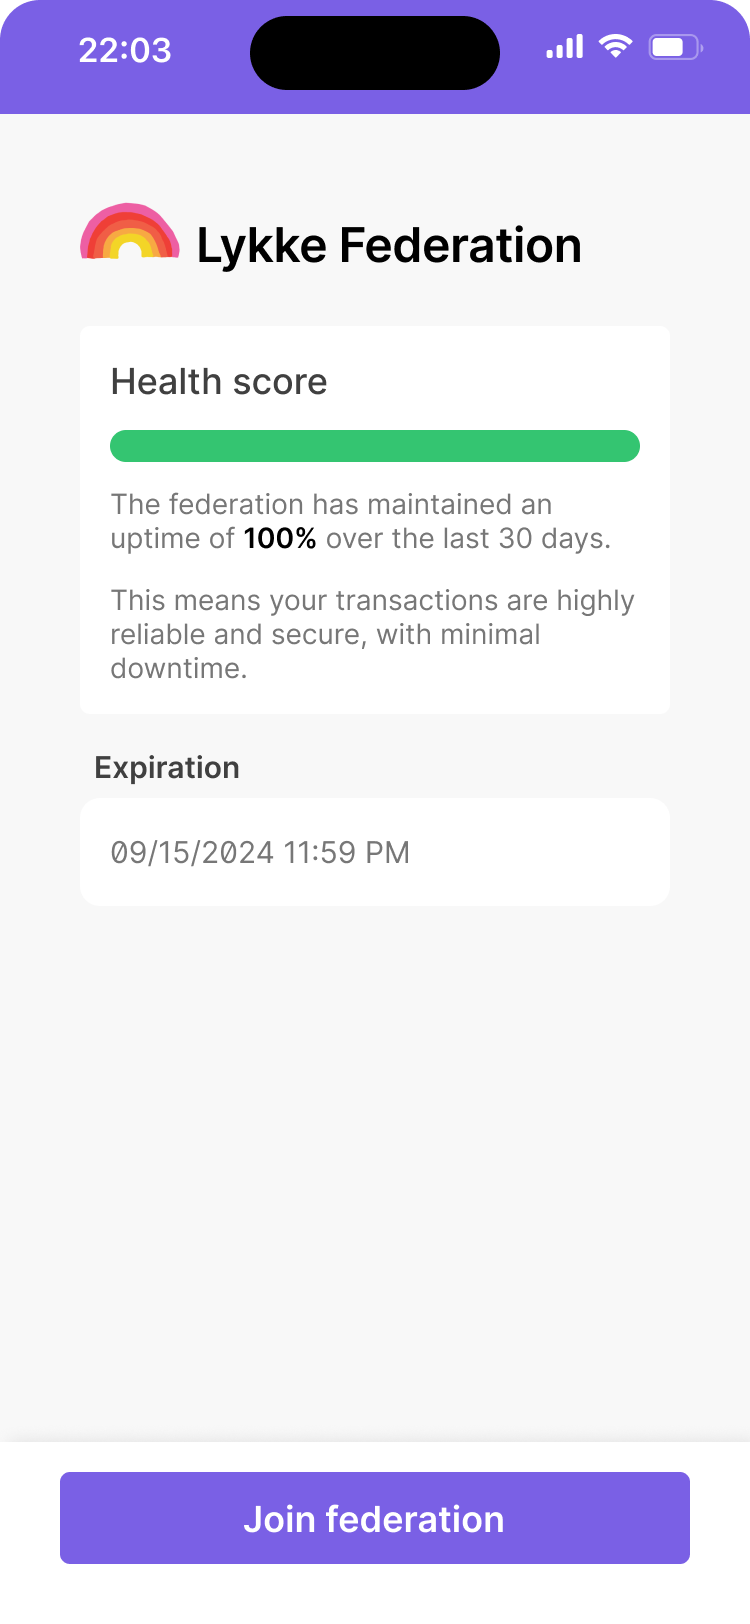
Federation expiration timestamp displayed as a data field when more than 30 days remain or the user hasn’t yet joined the federation.
federation_name: This field provides the name of the federation. It should be displayed prominently in the federation overview to help users quickly identify which federation they are interacting with.
federation_expiry_timestamp: This field contains a timestamp indicating when the federation will shut down. It’s crucial to display this information clearly to users, possibly with a countdown or warning as the expiration date approaches.
User onboarding and information
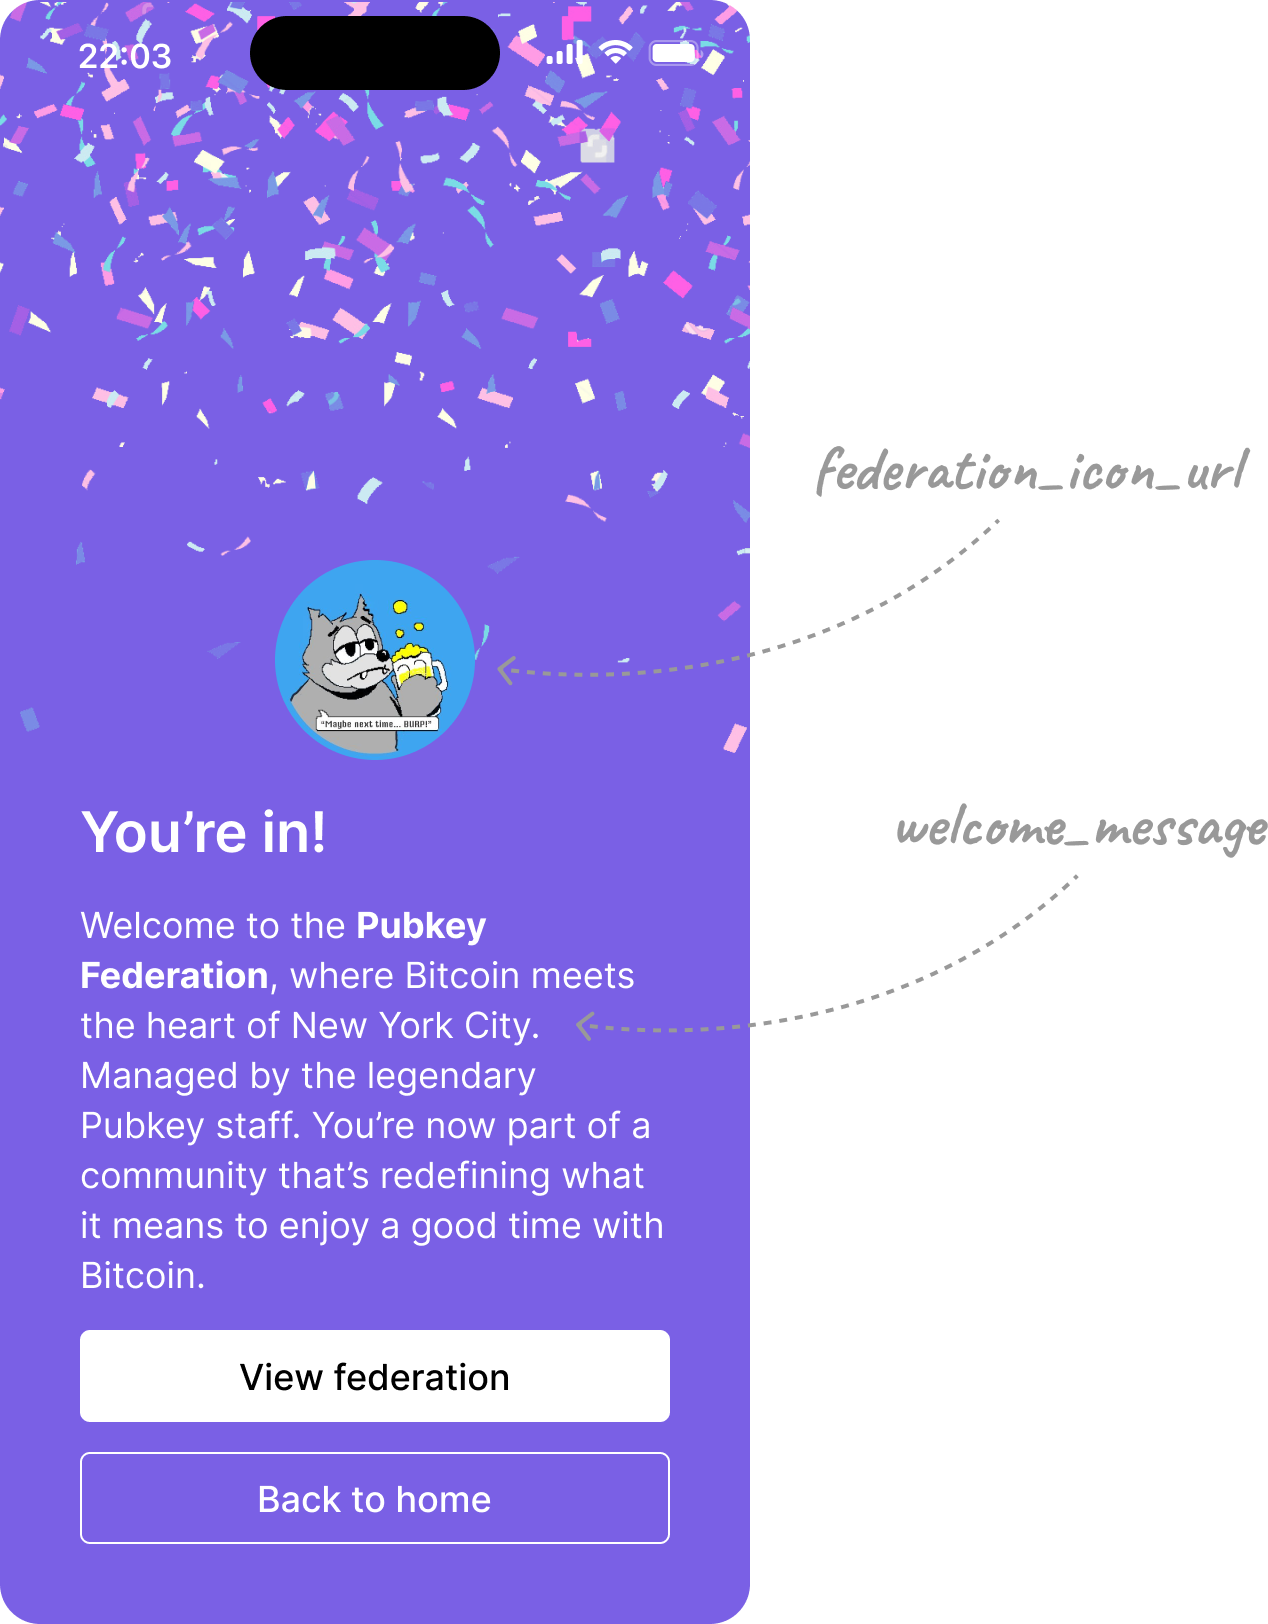
A welcome message being used during the new user onboarding process.
welcome_message: This field contains a welcome message for new users joining the federation. It could be displayed during the onboarding process to provide users with important information or instructions.
Flexible use of welcome message
Different federations may choose to display the welcome message in different contexts. Some may use it as a welcome message, others may use it to display the terms of service or other important information.
Organizing Fedimint metadata fields
When designing your Fedimint wallet interface, consider organizing these metadata fields in a logical, user-friendly manner to help users understand and interact with the federation. Here are some suggestions:
- Display the
federation_nameprominently in the federation overview for quick identification. - Create a detailed federation information page incorporating the
welcome_messageandfederation_expiry_timestamp, ensuring users are aware of important information and any time limitations. - Implement notifications or warnings based on the
federation_expiry_timestampto keep users informed about the federation’s lifespan.
By effectively incorporating these Fedimint metadata fields you can create a more transparent and informative experience for users, helping them understand the federation’s structure, rules, and trusted entities.
Next, learn how private key management works.